Earthbag Building 101: The Cheapest Off-Grid Home You Can Build
Earthbag building is one of the most practical ways to create a durable, low-cost shelter with local materials—often soil from your own site. In Earthbag Building 101: The Cheapest Off-Grid Home You Can Build, you’ll learn the real-world basics: how earthbag walls work, what you can (and can’t) build cheaply, how to plan for permits and moisture, and how to pair an earthbag structure with off-grid water, food, and power systems that make it truly livable.
If you’re aiming for an off-grid home that prioritizes resilience over luxury, earthbags offer a rare combination: high thermal mass, fire resistance, strong walls, and a building method that’s approachable for DIYers with patience and good prep.
Getting the earthbag concept right from day one
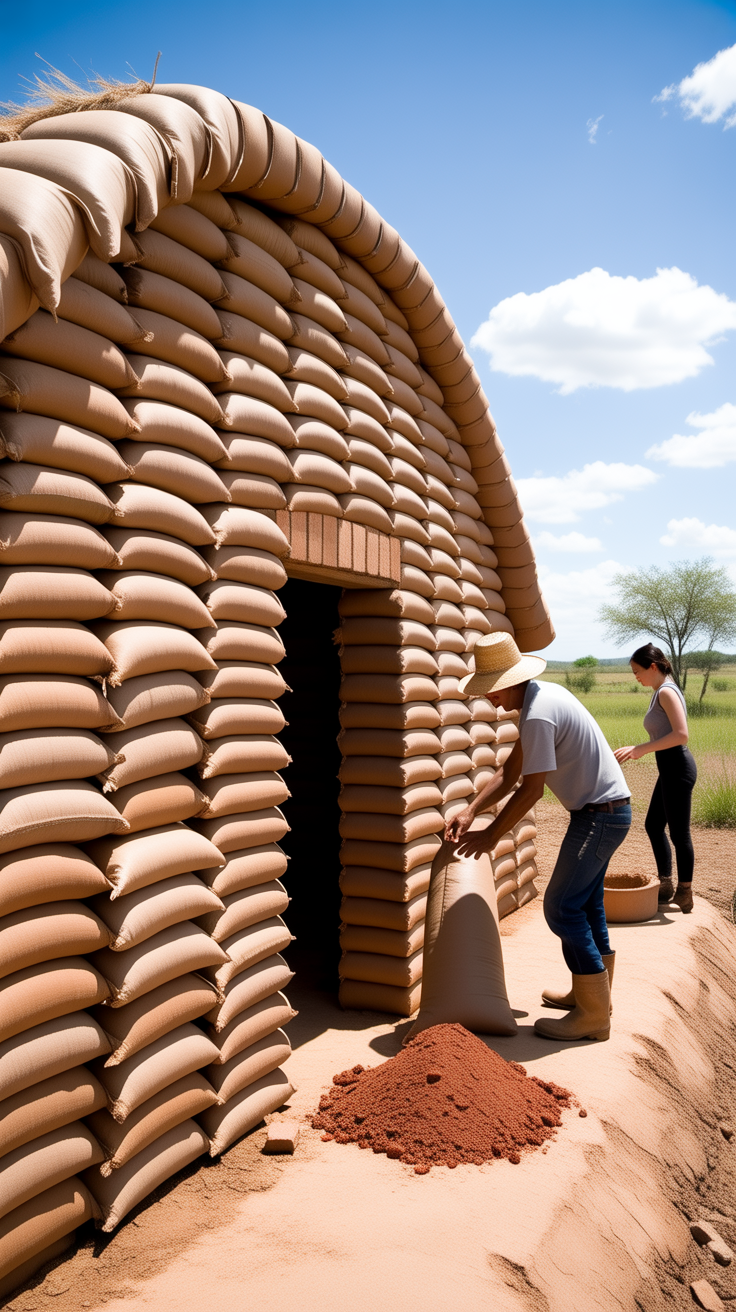
Earthbag construction is simple in principle: you fill woven bags (or long continuous tubes) with a suitable soil mix, stack them like giant adobe bricks, and lock each course together with barbed wire. The result is a thick wall system that can be straight, curved, domed, or buttressed—then finished with plaster to protect the bags from UV and weather.
Why earthbag is often the cheapest off-grid home option
Earthbag can be exceptionally affordable because the “mass” of the wall—its biggest component—is usually dirt. When your primary wall material comes from your property, your cash outlay shifts toward basics: bags, barbed wire, foundation supplies, plaster, roof materials, doors/windows, and tools.
Cost stays low when you:
- Build small (starting with 150–400 sq ft)
- Keep the design simple (rectangles or gentle curves)
- Use a straightforward roof (shed or gable)
- Source fill soil on-site and minimize trucking
- Avoid complex windows/penetrations early on
What earthbag is not
Earthbag isn’t a magic “free house.” It’s labor-heavy, and many budget blowouts happen at the roof, finishes, and utilities—not the walls. Also, earthbag walls need moisture management, good site drainage, and proper plastering. If you skip these, you can create a damp structure that fails early.
Off-grid living begins with water, not walls
Before you stack the first bag, think about the systems that keep you alive and comfortable: water storage/collection, filtration, sanitation, food storage, and backup power. Many off-grid builders use simple preparedness and self-sufficiency systems as a planning scaffold.
💡 Recommended Solution: Water Freedom System
Best for: building a practical off-grid water plan early
Why it works:
- Helps you think through storage and supply continuity
- Useful when your build site is remote or seasonal
- Supports a “systems-first” approach so the house serves the lifestyle
Choosing the right site and layout for an off-grid earthbag home
A good earthbag home starts with the land—not the blueprint. The cheapest build is the one that avoids expensive mistakes: poor drainage, frost heave, difficult access, and constant shade in winter.
Site selection priorities that protect your budget
Focus on factors that reduce long-term risk:
- Drainage: Choose higher ground or a gentle slope. Avoid low spots and seasonal puddle zones.
- Soil availability: If you can dig your own fill, you save dramatically. Soils with some clay content generally compact well.
- Access: If trucks can’t reach your site, every heavy item becomes a manual carry.
- Solar orientation: Even with thermal mass walls, you want winter sun and summer shade strategy.
- Wind and wildfire: Natural windbreaks and defensible space matter.
If your off-grid plan includes gardening, water harvesting, or animals, place the home to support daily movement: close enough to the garden to manage it, far enough from animals to avoid odor and flies.
Layout guidelines that keep earthbag construction simple
Earthbag walls excel when shapes are stable and loads are predictable. For a first build:
- Rectangular or rounded rectangles are easy to roof.
- Curves add strength, but complex curves add layout time.
- Keep spans short to avoid adding structural beams you didn’t budget for.
- Plan a “wet wall” so plumbing and drainage consolidate in one area.
A small off-grid footprint is often the smartest first step. Many experienced builders start with a studio cabin and add later, rather than attempting a full multi-room house upfront.
Long-term resilience thinking for remote builds
If you’re building off-grid, assume supply chain disruptions, storms, and medical or repair needs when you’re far from town. It’s wise to keep practical reference materials and home-care readiness on hand.
As wilderness medicine educators often emphasize, “Your first line of self-reliance is what you can do at home before help arrives.” That’s why many off-grid households keep resources like Home Doctor for general preparedness planning, especially when you’re remote and doing physical labor daily.
Materials and tools that actually matter for earthbag building
Earthbag building looks like “just bags and dirt,” but quality, consistency, and the right basic tools are what keep your walls straight, compacted, and dry.
Bags vs. tubes and what beginners should choose
- Individual sandbags: Easier to source in small batches, simple to handle, good for beginners and tight spaces.
- Continuous tubes (long bags): Faster wall building once you get the rhythm, fewer seams, and often ideal for curved walls.
Either can work. The key is UV protection: polypropylene bags degrade in sunlight. Plan to cover walls quickly with plaster or temporary tarps.
Fill soil basics (and how to avoid wall failure)
A common principle is: you need a soil mix that compacts well and doesn’t expand excessively when wet. Many builders aim for a blend of sand/gravel and clay/silt that locks together when tamped.
Practical low-cost steps:
- Do jar tests with your soil (settling layers) to understand composition.
- Make a few test bags, tamp, let them dry, then drop-test for durability.
- If your soil is too clay-heavy, blend with sand or small gravel.
- If it’s too sandy and won’t bind, blend in a bit more clay-rich soil.
Avoid organic-rich topsoil for wall fill. Strip topsoil and save it for gardens.
The core tool kit
You don’t need fancy equipment, but you do need:
- Strong tampers (hand tampers are common)
- Shovels, buckets, wheelbarrow
- A level, plumb bob, string lines
- Measuring tape, stakes, chalk line
- Barbed wire (typically two strands per course)
- Tin snips and gloves (barbed wire is unforgiving)
If you’re far from utilities, factor in how you’ll run saws, mixers, and chargers. Many off-grid builders pair minimal wall costs with reliable DIY power options.
💡 Recommended Solution: Ultimate OFF-GRID Generator
Best for: powering tools, lights, and charging during the build
Why it works:
- Supports jobsite power without relying on grid access
- Useful for remote locations where fuel runs are costly
- Helps keep progress steady when the build stretches over weeks
While fuel generators are popular, a DIY-oriented approach like the Ultimate OFF-GRID Generator can be a useful alternative framework for people who want redundancy without constant fuel dependence.
Foundations, moisture control, and the details that keep walls standing
Moisture is the enemy of earthbag walls—not because earth is weak, but because prolonged saturation can compromise plasters, encourage mold, and weaken wall interfaces. The cheapest off-grid home becomes expensive fast if you fight water after the fact.
Start with drainage and a raised wall base
Your priorities:
- Get water away from the building (grading, swales, perimeter drains where appropriate).
- Raise the first course above grade using a rubble trench foundation, gravel-filled stem, or other stabilized base.
- Use a capillary break (gravel and moisture barriers where appropriate) so moisture doesn’t wick upward.
A common low-cost strategy is a rubble trench foundation—stone/gravel that drains water away instead of trapping it.
Floor options for low-budget off-grid builds
Choose based on climate and moisture:
- Earthen floor: Very low cost, comfortable, but must be sealed properly and protected from rising damp.
- Limecrete or stabilized floors: More durable and moisture tolerant than raw earthen floors.
- Pallet/raised wood floor: Quick and accessible but can reduce thermal mass benefits.
The “best” floor is the one that fits your climate and keeps water from living in your foundation.
Roof overhangs are not optional
If you take only one technical lesson from earthbag building, make it this: big roof overhangs protect plaster and walls. A generous eave reduces wall wetting dramatically.
- Aim for wide overhangs if storms are common.
- Add drip edges and proper gutters.
- Keep splashback away with gravel skirts around the perimeter.
Water security is part of moisture control
Moisture control includes keeping clean water separate from waste and planning reliable storage. Off-grid homes fail quickly when water planning is improvised.
“Most resilience failures start when water becomes uncertain,” as many emergency preparedness instructors point out. Tools like SmartWaterBox are often used as a planning aid to create a clear picture of storage, treatment, and continuity—especially when you’re building far from municipal supplies.
Building the walls: stacking, tamping, openings, and bond beams
This is the heart of Earthbag Building 101: The Cheapest Off-Grid Home You Can Build—the actual wall workflow. The good news: once you set up your system, it becomes repetitive and satisfying.
The basic wall cycle
Most earthbag wall building follows a consistent rhythm:
- Fill bags/tubes with the chosen soil mix.
- Lay the course on a level bed.
- Add barbed wire (usually two strands) to prevent slippage.
- Tamp thoroughly to compact and level.
- Check plumb, level, and alignment with each course.
- Repeat until wall height is reached.
Daily consistency matters more than speed. A slightly slower build that stays straight saves days of correction later.
Straight walls vs. curved walls
Curved walls resist lateral forces well and can be naturally strong, but beginners sometimes find layout tricky. Straight walls are easier for roofing and window framing. A hybrid approach—straight walls with rounded corners—often gives good strength with simpler construction.
Planning openings so they don’t weaken your structure
Doors and windows are where DIY earthbag builds often go wrong. Keep it simple:
- Use fewer, well-placed openings.
- Keep openings away from corners.
- Add strong lintels or frames designed for the load.
- Consider smaller windows for thermal performance.
Also think about security and storm protection. Off-grid homes can be isolated; durable shutters and thoughtful placement matter.
Bond beams and tying the roof to the walls
At the top of the walls, builders often use a bond beam (wood, reinforced concrete, or other engineered options depending on code and design) to distribute roof loads and tie everything together. This is especially important in seismic or high-wind areas.
If you want your cheapest off-grid home to be more than a shed, budget attention for this step. A weak roof-to-wall connection can ruin an otherwise solid earthbag project.
Staying prepared during a long build
Earthbag building is physically demanding and often done in remote settings—exactly where disruptions happen. Many off-gridders use preparedness frameworks to avoid “project stall” when weather, supply issues, or local instability hits.
💡 Recommended Solution: URBAN Survival Code
Best for: building a broader readiness mindset while you build off-grid
Why it works:
- Encourages planning for short-term disruptions and personal security
- Useful when your build spans seasons and conditions change
- Helps structure practical next steps beyond “just the house”
Plaster, finishes, and making an earthbag home comfortable year-round
Earthbag walls are not “done” when they’re stacked. The finish layers are what protect the bags, regulate moisture, and give the home a livable feel.
Plaster types and what they do
The finish system typically needs to:
- Protect bags from UV
- Shed rain and resist erosion
- Allow the wall to breathe (in many climates)
- Resist cracking with fiber and proper layering
Common plaster options include earthen plasters, lime plasters, and cement-based plasters. Many natural builders prefer breathable systems, especially where walls need to dry out seasonally. Your climate and local codes should guide this choice.
Cracking, maintenance, and realistic expectations
Small cracks happen in many plaster systems, especially with temperature swings. The skill is in:
- Good wall preparation (scratch coat keying)
- Proper curing
- Adding fiber reinforcement where needed
- Considering mesh in vulnerable areas
- Designing generous overhangs to minimize wetting
Think of plaster as a maintainable “skin.” A yearly inspection and small patch work is normal home stewardship—like repainting wood siding.
Comfort strategies: thermal mass + ventilation
Earthbag walls have high thermal mass, meaning they absorb and release heat slowly. That’s useful—but only if you manage:
- Sun exposure (passive solar design)
- Night flushing in hot climates (ventilation at night)
- Insulation strategy, especially at the roof (heat rises)
In many climates, the roof insulation matters more than wall insulation for comfort and efficiency. Don’t overspend on wall complexity while neglecting the roof assembly.
Food and storage as part of “comfort”
Comfort isn’t only temperature—it’s knowing you have food when roads wash out or supply chains tighten. Many off-grid builders build pantry depth alongside construction.
As food resilience educators often say, “A homestead without a pantry is just a pretty campsite.” If you’re expanding your shelf-stable planning, The Lost SuperFoods is commonly used as a reference-style resource for broadening food options beyond the usual store-bought staples—especially helpful when you’re prioritizing storability and variety.
Off-grid systems that pair perfectly with earthbag homes
Earthbag walls can give you an affordable structure, but the off-grid lifestyle depends on systems. The most successful builds treat the home like a “shell” wrapped around water, power, sanitation, heating, and food.
Water: collection, storage, treatment
An earthbag home with big overhangs can be an excellent rain-catchment platform if your roof and guttering are designed for it. Your plan should include:
- Primary source (rain, well, spring, hauled)
- Storage capacity (seasonal planning)
- Treatment method (filter, boil, chemical, UV—often layered)
- Redundancy (backup method and containers)
Many professionals rely on structured water-planning tools like SmartWaterBox to streamline decision-making when building out storage and treatment routines—especially when you’re trying to avoid expensive “do-overs” later.
Power: start small, expand modularly
A common mistake is trying to power a normal suburban lifestyle off-grid immediately. Instead:
- Start with lighting, device charging, and essential tools
- Add refrigeration if your budget allows
- Expand to pumps, workshop loads, and comfort appliances later
If you want a structured approach to off-grid energy planning, many builders explore DIY frameworks like Energy Revolution System as a step-by-step way to think about small-scale generation and resilience.
Sanitation: keep it simple, lawful, and maintainable
Options vary by location and regulation:
- Composting toilets (need correct management)
- Septic systems (often regulated and costly but reliable)
- Dedicated greywater (sometimes permitted with conditions)
Your cheapest off-grid home can become a legal headache if sanitation is treated as an afterthought. Check local requirements early.
Tools & resources for self-sufficiency planning
If your goal is a low-cost earthbag home that supports a self-reliant lifestyle, these resources are often used as planning supports:
- The Self-Sufficient Backyard — practical backyard-scale food and systems planning
- Water Freedom System — water continuity and storage strategy guidance
- Ultimate OFF-GRID Generator — a DIY-oriented approach to jobsite and homestead power thinking
Conclusion: building the cheapest off-grid home the smart way
Earthbag Building 101: The Cheapest Off-Grid Home You Can Build comes down to a few fundamentals: choose a good site with drainage, use suitable soil and consistent tamping, protect walls from moisture with a raised base and big roof overhangs, and finish with a durable plaster system. Keep the design simple, build small first, and invest planning energy into off-grid systems—water, sanitation, and power—so your structure becomes a real home rather than a temporary shelter.
Earthbag building rewards patience and good habits. Do the boring steps well (testing soil, leveling courses, managing moisture), and you’ll end up with a strong, fire-resistant, low-cost off-grid home that can serve you for decades.
FAQ
What is the biggest mistake beginners make in earthbag building?
The most common mistake is ignoring moisture management—poor drainage, no raised base, small roof overhangs, or rushing plaster. Earthbag walls can be extremely durable, but they must be protected from long-term saturation and UV exposure.
Is earthbag building really the cheapest off-grid home you can build?
Often, yes—especially if you can source fill soil on-site and keep the design small and simple. However, the roof, windows/doors, plaster, and off-grid systems can cost more than expected. Earthbag reduces wall costs, not necessarily total project costs.
Do earthbag homes need permits and engineering?
Sometimes. Requirements vary widely by region. Some areas treat earthbag as alternative construction and may require engineering approval, while others have more flexible rural standards. Always check local building codes and consider professional guidance for seismic, wind, or snow-load zones.
Can you build an earthbag home with no experience?
Yes, many DIYers do—success depends on learning the process, practicing with a test wall, and staying consistent with leveling, tamping, and barbed wire placement. Starting with a small structure (like a studio cabin) is a practical way to learn.
How do you make an earthbag home truly livable off-grid?
Pair the structure with reliable systems: water collection/storage/treatment, a lawful sanitation plan, and scalable power. Many builders start with a “water-first” plan using tools like Water Freedom System, then add power planning via Ultimate OFF-GRID Generator or structured approaches like Energy Revolution System.
RANK MATH SEO BLOCK
SEO Title (≤60 chars): Earthbag Building 101: Cheapest Off-Grid Home Guide
Meta Description (≤160 chars): Learn Earthbag Building 101: The Cheapest Off-Grid Home You Can Build—site, materials, walls, plaster, and off-grid water/power basics.
URL Slug: earthbag-building-101-cheapest-off-grid-home
Focus Keyword: Earthbag Building 101: The Cheapest Off-Grid Home You Can Build
Suggested Schema Type: FAQ