
How to Insulate a Cabin or Tiny Home for Winter Without Spending a Fortune
Winter comfort in a cabin or tiny home isn’t about having a massive furnace or spending thousands on premium “eco” materials—it’s about stopping heat loss in the right places. If you’ve been wondering how to insulate a cabin or tiny home for winter without spending a fortune, the biggest wins usually come from: air sealing first, insulating your “biggest leak” surfaces second, and adding simple upgrades that prevent moisture problems. Do those in order, and you can cut drafts dramatically, reduce fuel use, and make a small space feel noticeably warmer—often within a weekend.
A cold tiny home is rarely “under-heated.” More often, it’s under-sealed and under-insulated in a few high-impact zones: the floor, roof/ceiling, rim joists, windows/doors, and every little gap where air sneaks in. This guide walks you through a practical, budget-focused plan that works whether you’re full-time off-grid, weekend-cabin living, or parked in a windy valley.
Winter heat loss basics for small spaces
The three ways you lose heat
Heat escapes in three main ways:
- Air leakage (drafts): Warm air leaving and cold air entering through cracks, gaps, and openings. This is often the #1 issue in cabins and DIY tiny homes.
- Conduction: Heat moving through materials (thin walls, uninsulated floors, roof decking).
- Moisture/condensation: Wet insulation performs poorly; humidity can create cold clammy surfaces even when the air is warm.
In a tiny home, the surface-area-to-volume ratio is unforgiving. You have a lot of exterior surface per cubic foot of interior air. That means small improvements can make a big difference—but it also means mistakes (like missing air sealing) show up fast.
Priority order that saves money
If you’re working with limited cash, your best “sequence” is:
- Air seal
- Roof/ceiling insulation
- Floor and rim-joist insulation
- Windows/doors upgrades
- Wall improvements (if needed)
Do it in that order and you typically get the most comfort per dollar.
Air sealing tactics that pay off fast
Air sealing is the cheapest, highest-impact step for winter comfort. Insulation slows heat transfer, but it doesn’t stop wind washing (cold air blowing through/around insulation). Seal first, then insulate.
Find drafts without fancy tools
You can locate leaks with:
- A flashlight test at night (shine from inside toward edges; look for light outside, or reverse)
- A cheap incense stick (smoke movement shows airflow)
- A thin tissue held near trim, outlets, and seams
- A cold morning walk-through: feel for moving air at baseboards, corners, and window edges
Common leak zones in cabins/tiny homes:
- Door thresholds and weatherstripping gaps
- Window trim and casing
- Plumbing penetrations under sinks and behind toilets
- Electrical outlets on exterior walls
- Ceiling light boxes and vent fans
- Loft access panels
- Trailer frame penetrations and underbelly openings (tiny homes)
Budget sealing materials (and where to use them)
- Acrylic/latex caulk: interior trim gaps, baseboards, casing
- Silicone caulk: kitchens/baths (moisture areas)
- Expanding foam (minimal-expansion): around window/door rough openings, larger cracks
- Foam gasket plates: behind outlet/switch covers
- Weatherstripping: door edges, window sashes
- Door sweep + threshold seal: huge comfort improvement for little money
- Aluminum foil HVAC tape: sealing duct joints, metal seams, some underbelly patches (better than cloth “duct tape”)
“As a building envelope specialist” quote format (expert-style guidance)
“As building envelope specialists often emphasize, ‘Draft control is the cheapest insulation you’ll ever buy—because it works immediately and it makes every other upgrade more effective.’”
That’s the core truth: air sealing makes your insulation actually behave like insulation.
Roof and ceiling insulation on a tight budget
If you can only insulate one surface well, choose the ceiling/roof. Heat rises, and roofs are often under-insulated—especially in older cabins or DIY builds.
Choose your approach based on your ceiling type
Cathedral/lofted ceilings (limited cavity depth)
- Best: rigid foam board + taped seams (adds R-value with minimal thickness)
- Maintain ventilation if you have a vented roof system (don’t block soffit-to-ridge airflow)
Flat ceilings with attic space
- Best budget option: blown-in or batt insulation laid evenly
- Add air sealing at ceiling penetrations before insulating (lights, vents, top plates)
Metal roof cabins
- Condensation risk is real. You want:
- air sealing on the warm side
- proper ventilation or a dedicated condensation control layer
- dry insulation kept away from direct metal contact if the assembly isn’t designed for it
Low-cost materials that work
- Fiberglass batts: cheap, widely available, decent performance if installed correctly (no gaps, no compression)
- Mineral wool: often pricier but excellent in moisture/airflow situations; also more fire resistant
- Rigid foam board (polyiso/EPS/XPS): great for thin assemblies and thermal break layers; tape seams for air barrier performance
Avoid the “insulation that doesn’t insulate” mistake
Budget installs often fail because of:
- compressed batts (reduces R-value)
- gaps at edges
- missing air sealing
- wind washing (air blowing through insulation)
If you’re using batts, cut precisely and friction-fit snugly. If you’re using foam board, tape every seam like you mean it.
Floor, skirting, and underbelly insulation for tiny homes and cabins
A cold floor can make the whole home feel unlivable, even if your air temperature is fine. Floors also hide major air leaks.
Cabin floors over crawlspaces
If your cabin sits over a crawlspace, you have two main strategies:
Option A: Insulate the floor (between joists)
- Air seal subfloor penetrations first (plumbing/electrical)
- Install batts or mineral wool snugly
- Use netting or strapping to keep batts in contact with the subfloor
- Add a vapor strategy appropriate to your climate (avoid trapping moisture)
Option B: Condition the crawlspace (sometimes better)
- Seal crawlspace vents (climate-dependent)
- Ground vapor barrier (poly)
- Insulate crawlspace walls instead of the floor
This can be more complex—but in some situations it’s warmer and reduces frozen pipes.
Tiny homes on trailers: the underbelly reality
Tiny homes lose heat through:
- exposed underbelly seams
- metal trailer thermal bridging
- underfloor plumbing runs
Big wins:
- Seal the underbelly (tape seams, patch gaps)
- Add insulation under the floor if accessible
- Consider skirting in winter to cut wind
Affordable winter skirting ideas
- Rigid foam board panels (taped and braced)
- DIY framed panels with foam inside
- Heavy-duty tarps as temporary wind block (not insulation, but helps)
Skirting primarily reduces wind-driven heat loss, which can be dramatic in open areas.
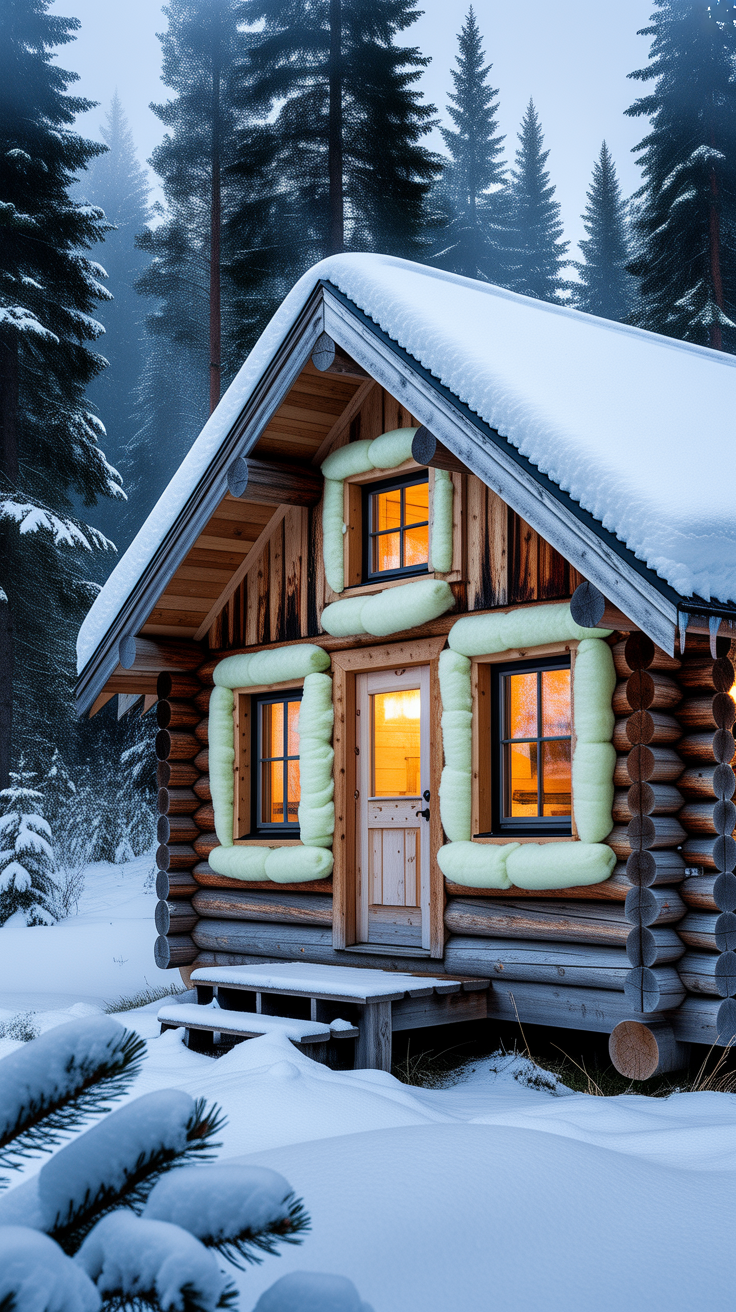
Windows and doors that stop drafts without replacing them
Window replacement is expensive and usually not the first “budget insulation” move. You can get major improvements without new windows.
The “three-layer” window strategy
- Seal the trim (caulk at casing edges; foam in rough opening if accessible)
- Weatherstrip the moving parts (sashes, meeting rails)
- Add an interior air barrier layer
- shrink-film window kits
- acrylic interior panels
- heavy thermal curtains with tight edges
Shrink film looks simple, but it creates a dead-air space that boosts comfort especially at night.
Door upgrades that matter
- Replace flattened weatherstripping
- Install a door sweep
- Seal threshold gaps
- Use a draft stopper as a temporary fix
A door that leaks air will defeat your heater faster than you think in a tiny space.
Wall insulation upgrades when you can’t open the walls
Wall insulation is often the hardest to retrofit cheaply, especially in finished tiny homes and cabins. Focus on the easy wins first, then consider wall improvements if you still need more comfort.
Non-invasive wall strategies
- Seal electrical boxes on exterior walls (foam gaskets)
- Seal baseboard-to-floor seams
- Add a thermal break behind furniture placed against exterior walls
- Use reflective barriers only when there’s an air gap (don’t expect miracles without proper installation)
When opening a section makes sense
If you have one wall that’s always cold (north-facing, wind exposure), it can be worth opening a small area to:
- air seal corners and penetrations
- add insulation properly
- address moisture issues
If you find damp insulation or mold, solve moisture/ventilation first—otherwise your insulation investment won’t last.
Moisture control and safe ventilation in winter
Warm air holds moisture. In small homes, humidity builds fast from cooking, showers, drying clothes, and even breathing. That moisture can condense on cold surfaces, making rooms feel colder and creating long-term rot risk.
Signs your winter moisture is too high
- condensation on windows every morning
- musty smell in corners or closets
- frost on nails/roof fasteners
- damp bedding near exterior walls
Low-cost moisture control steps
- Run bath/kitchen fans (and ensure they vent outdoors)
- Crack a window briefly while cooking (short, strong ventilation beats long, weak ventilation)
- Use a small dehumidifier if you have reliable power
- Keep furniture slightly off exterior walls
- Seal major air leaks to prevent moist indoor air from reaching cold cavities
Good insulation is also moisture management: it keeps surfaces warmer so water vapor is less likely to condense.
Heating smarter after insulating: comfort per dollar
After you seal and insulate, your existing heat source usually feels “bigger.” This is where many people realize they don’t need a costly heater upgrade.
Heat distribution matters in tiny spaces
- Use a small fan to move warm air off the ceiling and into living zones
- Keep interior doors open (or add transfer grilles) so heat doesn’t get trapped
- For cabins with lofts, manage stratification (warm loft air, cold downstairs)
Off-grid resilience considerations (without overspending)
If winter storms take out power or limit access to supplies, resiliency upgrades complement insulation:
💡 Recommended Solution: Ultimate OFF-GRID Generator
Best for: maintaining essential power for fans, small heaters, battery charging, and emergency lighting
Why it works:
- Supports winter comfort basics without grid dependency
- Helps keep pipes safer by powering small heat sources when needed
- Adds redundancy for remote cabin living
Many professionals rely on tools like Ultimate OFF-GRID Generator to streamline off-grid planning—especially when winter access roads make fuel and supply runs unpredictable.
Winterizing on a shoestring: a practical weekend checklist
If you want the most impact in 1–2 days, do this:
Day 1: Stop drafts and obvious leaks
- Install/replace door sweep and weatherstripping
- Caulk interior trim gaps at windows/doors
- Foam major penetrations (plumbing/electrical)
- Add outlet/switch gaskets on exterior walls
- Seal under-sink and behind-toilet pipe holes
Day 2: Add insulation where it counts
- Top up attic/ceiling insulation where accessible
- Insulate exposed rim joists or underfloor sections
- Apply shrink film to the coldest windows
- Add temporary skirting if wind under the home is the problem
If you do nothing else, sealing + ceiling insulation usually delivers the most immediate “wow” factor.
Tools and resources that support winter-ready self-sufficiency
Insulating well reduces heat demand, but winter comfort also depends on water access, food planning, and emergency readiness—especially for cabins and tiny homes in remote areas.
💡 Recommended Solution: SmartWaterBox
Best for: backup water planning when lines freeze or access is limited
Why it works:
- Helps support emergency water readiness for winter disruptions
- Useful when hauling water or dealing with frozen infrastructure
- Complements off-grid and storm preparedness
💡 Recommended Solution: The Lost SuperFoods
Best for: building a shelf-stable food plan to reduce winter supply runs
Why it works:
- Encourages practical food resilience during storms
- Supports long-term pantry planning for remote living
- Pairs well with low-energy winter cooking strategies
💡 Recommended Solution: Home Doctor
Best for: general home-and-family preparedness in winter conditions
Why it works:
- Supports planning for common cold-weather emergencies
- Helps you think through contingencies beyond heating alone
- Useful when weather delays access to help or supplies
“As many preparedness educators note, ‘In winter, resilience is a system—heat, water, food, and a plan.’ Tools like SmartWaterBox and The Lost SuperFoods are often used as part of that bigger system, not a single-point solution.”
Conclusion
Learning how to insulate a cabin or tiny home for winter without spending a fortune comes down to doing the right upgrades in the right order. Start with air sealing (it’s the cheapest comfort upgrade), then focus on roof/ceiling insulation, followed by the floor/underbelly and rim areas, and finally improve windows and doors without rushing into expensive replacements. Keep moisture under control so your insulation stays effective, and use simple distribution tricks to make every bit of heat feel stronger.
Once drafts are gone and your main surfaces are insulated, your home will hold heat longer, feel less “sharp-cold,” and cost less to keep comfortable—whether you’re heating with electricity, propane, or wood.
FAQ
What is the cheapest way to insulate a cabin for winter?
The cheapest high-impact approach is air sealing: caulk trim gaps, foam penetrations, add outlet gaskets, and replace door weatherstripping. Then add insulation to the ceiling/attic if accessible.
How can I insulate a tiny home for winter without replacing windows?
Use a layered strategy: seal window trim, weatherstrip moving parts, and add an interior barrier like shrink film kits or tight-fitting interior panels. Thermal curtains can help, but stopping air leaks matters most.
Should I insulate the floor or the walls first in a small cabin?
In most cases, prioritize ceiling/roof first, then floor/rim areas, then walls. Walls are often harder and more expensive to retrofit, while floors and ceilings typically provide faster comfort gains.
How do I stop cold air coming through the floor in a tiny home on a trailer?
Seal the underbelly openings, add underfloor insulation where possible, and install winter skirting to block wind. Wind under the home can make floors feel dramatically colder even with decent insulation.
How do I avoid condensation problems after insulating?
Control indoor humidity and keep assemblies able to dry. Vent kitchens and bathrooms outdoors, air seal to prevent moist air reaching cold cavities, and avoid trapping moisture with the wrong vapor layer for your climate.
RANK MATH SEO BLOCK
SEO Title (≤60 chars): Insulate a Cabin or Tiny Home for Winter on a Budget
Meta Description (≤160 chars): Learn how to insulate a cabin or tiny home for winter without spending a fortune—air sealing, roof, floor, windows, and moisture control.
URL Slug: insulate-cabin-tiny-home-winter-budget
Focus Keyword: How to Insulate a Cabin or Tiny Home for Winter Without Spending a Fortune
Suggested Schema Type: FAQ