
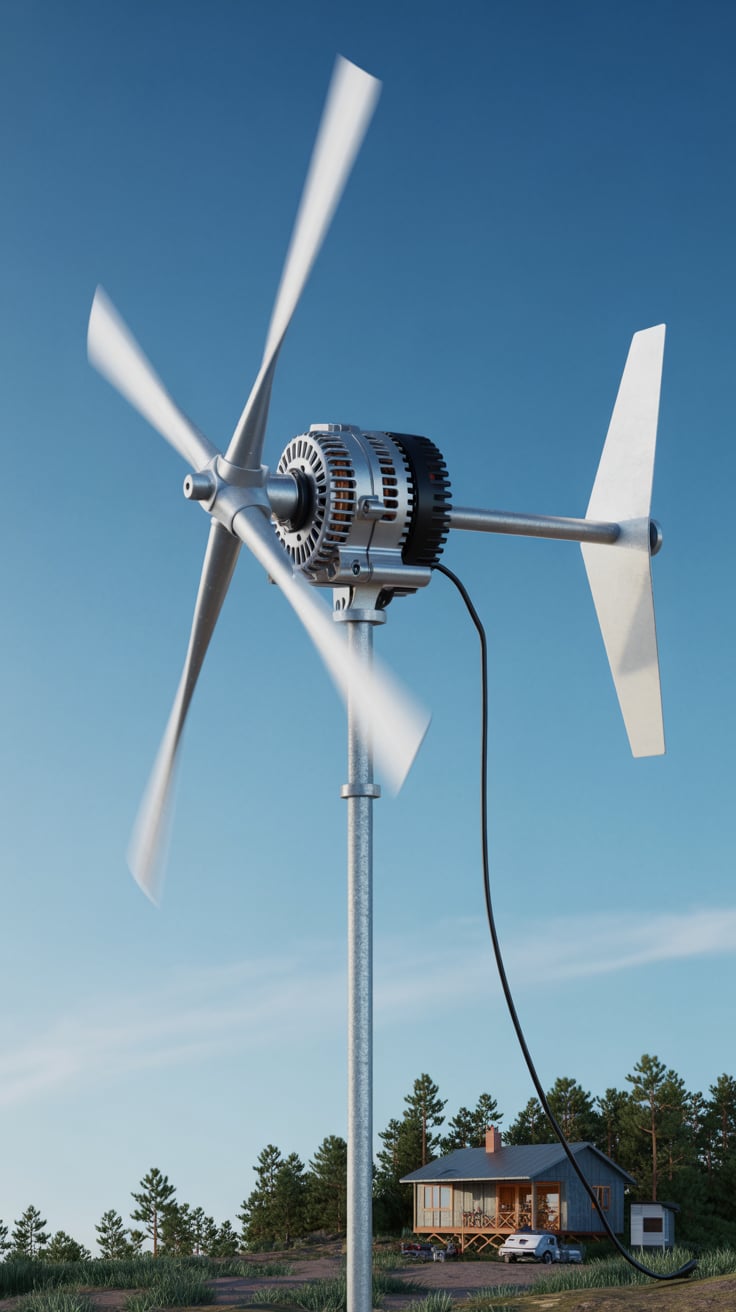
Off-grid electricity doesn’t have to be exotic or expensive. With a little engineering and a modest budget, you can build a powerful wind generator with a car alternator and start charging batteries for lights, communications, fridge cycling, or tool charging. This guide walks you through planning, parts, safety, wiring, and performance tuning—so you can build a reliable DIY wind turbine that actually works, not just spins.
If you’re also planning water independence alongside your build, consider adding a compact, practical solution like SmartWaterBox to your off-grid setup so your power and water plans evolve together.
Table of Contents
How a Car Alternator Becomes a Wind Generator
A car alternator is a rugged, mass-produced electrical machine designed to generate DC power (via an internal rectifier) from the engine’s rotation. In a vehicle, the engine spins the alternator very fast—typically thousands of RPM—so it can produce power at low engine speeds and keep up with electrical loads. This design philosophy is both helpful and challenging when you want to convert it for wind.
Key concepts to understand:
- Cut-in speed: The minimum rotational speed at which the alternator begins to produce charging voltage above your battery voltage (e.g., 13.5–14.4 V for a 12 V battery bank).
- Excitation: Most automotive alternators are wound-field machines. The rotor needs an excitation current (field current) to generate a magnetic field. Without that field, output is minimal. That means you’ll need to supply a small current initially (often via the voltage regulator) to get it going.
- RPM requirements: Stock car alternators often need high RPM to produce useful power. Wind rotors typically spin far slower. You bridge this gap with either gearing (belt and pulley or chain and sprocket) or by converting to a permanent magnet alternator (PMA) rotor, which reduces cut-in RPM.
Common pathways for DIYers:
- Use a stock alternator with an external regulator and a belt-and-pulley ratio (e.g., rotor at 300 RPM, alternator at 1,500–2,000+ RPM) to reach cut-in and decent output.
- Convert a compatible alternator (often Delco-style) to a PMA by replacing the rotor with a permanent magnet rotor kit. This increases low-RPM efficiency and can eliminate the need for a high ratio.
- Choose battery bank voltage wisely: A 24 V or 48 V battery bank allows lower current for a given power level, reducing losses and making long wire runs more feasible. However, it raises cut-in voltage and demands more RPM to start charging.
Wind-specific considerations:
- Wind power scales with the cube of wind speed and the square of rotor diameter. Even small gains in swept area (larger blades) or wind speed have huge impacts on energy.
- Tip-speed ratio (TSR) matters. For most 3-blade horizontal axis wind turbines, a TSR between 5–7 is a practical target. Your blades should match the alternator’s torque profile and gearing so the system reaches and holds efficient RPM in typical winds.
Bottom line: A car alternator can be an effective wind generator if you handle excitation, RPM, and system matching. The better your rotor and gearing match your alternator’s operating range, the more “real” power you’ll get in everyday winds.
Planning and Design Choices for a Reliable Build
Start with your goals and site realities. Off-grid systems fail when they’re designed in isolation from the environment they’ll live in.
- Average wind speed: Use local wind maps or a simple anemometer to gauge typical speeds at 10–20 m height. A site averaging 10–12 mph (4.5–5.5 m/s) can support a small turbine for light loads; 12–14+ mph is much better.
- Energy needs: List daily loads (Wh). A radio and LED lights might need 100–300 Wh/day; adding a small fridge could push you to 600–1,200 Wh/day. Wind’s intermittent nature pairs well with a battery bank sized for your autonomy needs.
- System voltage: For modest systems and short wire runs, 12 V is fine. For higher power or longer runs, 24 V (or 48 V) reduces current and copper cost.
Core components checklist:
- Alternator: A common automotive alternator (ideally one known to be mod-friendly, like some Delco models). Decide whether to keep it wound-field or convert to PMA.
- Blades and hub: 3-blade sets are stable and efficient for DIY. Material options include carved wood, fiberglass, or heavy-duty PVC (acceptable for prototypes but less durable).
- Mechanical step-up: Belt/pulley or chain/sprocket (if staying wound-field) to multiply rotor RPM. Ratio commonly ranges 1:3 to 1:7 depending on your alternator’s profile and common wind speeds.
- Tower: A 6–10 m (20–33 ft) guyed tilt-up tower is a common DIY sweet spot. Overcoming ground turbulence is non-negotiable; the higher, the better (within safe, legal limits).
- Tail and yaw: A simple tail vane keeps the rotor facing the wind; a hinge for furling can protect the system in gusts.
- Electrical: Stop switch, rectifier (if your alternator’s internal rectifier remains, confirm ratings), diversion/dump-load controller (wind-specific), battery bank, and overcurrent protection.
- Braking and safety: A short-circuit-style “stop switch” on the alternator’s output and a mechanical method to tie off or furl the rotor are essential.
Budget and expectations:
- Low-cost builds can come together with scrounged parts, but reliability improves with quality bearings, proper hardware, and a real tower.
- Expect a small DIY alternator turbine to deliver from tens of watts in light winds to a few hundred watts in strong, sustained winds. Occasional peaks are less important than average daily energy.
Helpful off-grid resources:
- Combine your wind system planning with resilient water preparedness. A compact kit like SmartWaterBox can streamline water storage and filtration as you develop your energy system.
Rotor Blades, Hub, and Aerodynamic Tuning
Your wind rotor converts kinetic energy in moving air into rotational torque. Get this right, and the rest of the system works much better.
Blade count and profile:
- Three blades strike a balance between efficiency, smoothness, and ease of startup. Two blades can be fast but twitchy; more than three can start easily but may be slower.
- Airfoil selection: For DIY, you can approximate common airfoils (e.g., NACA profiles) by carving wood or shaping fiberglass. Even simple profiles can perform well if pitch and twist are tuned.
Diameter and swept area:
- Power ∝ swept area. A jump from a 1.2 m to a 1.8 m radius rotor nearly doubles swept area (πr²), greatly increasing power potential in the same wind.
- Match rotor size to tower strength, alternator torque, and your wind regime. Bigger is usually better—until your structure and gearing can’t handle the loads.
Pitch and twist:
- Inner sections of the blade move slower and need higher angle of attack; outer tips move faster and need lower angle to reduce drag. A tapered, twisted blade keeps the airfoil working efficiently along its length.
- Fixed-pitch works well for DIY if tailored to your average wind. Aim for a design that reaches efficient RPM at typical winds without over-speeding in gusts.
Tip-speed ratio (TSR):
- Target TSR ~5–7 for a three-blade rotor aimed at small alternator systems. For example, with a 1.6 m radius rotor and 8 m/s wind, a TSR of 6 implies a blade-tip speed of 48 m/s and an RPM around 285 RPM. Your gearing then might step this up to 1,400–1,800 RPM at the alternator.
Hub and mounting:
- Use a solid steel hub plate with grade-8 bolts and locking nuts. Balance the rotor by weighing blades and sanding/adding small balance weights so each blade matches within a few grams.
- Consider a tapered hub or a plywood-and-steel sandwich hub for DIY builds; just ensure rigidity and repeatable pitch angles.
Startup torque:
- Many stock alternators need torque to overcome bearing and magnetic drag. Wider chord near the root, slightly lower TSR, or a PMA conversion can help the rotor “unstick” and start in moderate winds.
Noise and durability:
- Smooth blade surfaces reduce noise. Round the leading edge slightly and keep the trailing edge crisp.
- Weatherproof with epoxy, varnish, or paint. Inspect annually for cracks, delamination, or UV damage.
Tower, Yaw Bearing, and Mechanical Safety
A powerful wind generator with car alternator is only as safe as its tower and mechanics. Structural integrity and controlled furling matter far more than squeezing out a few extra watts.
Tower types:
- Guyed tilt-up tower: A proven DIY standard. Build a stout base hinge, use three or four guy wire anchors, and a gin-pole for raising and lowering. This design makes maintenance and storm prep manageable without a crane.
- Freestanding towers are complex and expensive; not recommended for first builds.
Height and placement:
- Follow the “30/300 rule”: The rotor should be at least 30 ft above the nearest obstacle within 300 ft. This reduces turbulence and improves energy yield.
- Avoid roof mounts for anything beyond very small turbines; the vibration and gust loads can be severe.
Yaw and tail:
- A simple pipe-within-pipe yaw bearing (greased, with a thrust washer) allows the nacelle to wind-vane freely.
- Tail vane sizing: Large enough to align the rotor, small enough to allow furling at high wind speeds.
- Furling mechanism: Hinge the tail at an angle or offset the rotor slightly from the yaw axis so increasing thrust causes the rotor to yaw out of the wind. This passive control is a lifesaver in storms.
Mechanical drive:
- If using a belt drive to step up RPM, select appropriate pulley ratios and belt profiles. Shield belts and moving parts with guards.
- Keep shaft alignment true; mount high-quality bearings; use Loctite and locking hardware.
Safety essentials:
- Install a mechanical strap or line that can secure the tail or rotor when lowered for service.
- Include a widely accessible electrical stop switch at ground level to short the alternator output through a resistive load for braking.
- Check local zoning, structural codes, and setbacks. Notify utilities if needed; never build near power lines.
Mid-project preparedness tip: Off-grid builds are real-world projects where minor injuries can happen. Keeping practical medical knowledge on hand—like the commonsense guidance covered in Home Doctor—can be a quiet advantage when you’re working with blades, towers, and tools.
Wiring a Powerful Wind Generator with Car Alternator
Electrical design keeps your system safe, efficient, and battery-friendly. Think in terms of blocks: generator, rectification, control, storage, protection, and loads.
Rectification:
- Most car alternators already rectify AC to DC internally via a diode pack. Verify diode ratings and health before trusting them at sustained loads.
- Some PMA kits have external rectifiers; mount them on a heat sink with airflow.
Voltage regulation and diversion:
- Automotive voltage regulators are designed for engine environments, not wind. For wind, use a wind-specific charge controller that manages battery charging and provides a diversion (dump) load to prevent overcharging.
- A diversion controller shunts excess power into a resistive load (heating elements) once batteries reach absorption voltage. This protects both batteries and the alternator.
Stop switch and braking:
- A three-position switch (Run – Brake/Short – Off) on the DC side is common. The “Brake” position shorts the generator output through a resistor, creating strong electromagnetic braking.
- Never rely solely on open-circuit stopping in high winds; always have a safe braking method.
Batteries and system voltage:
- For small systems, deep-cycle AGM or lithium (LiFePO4) batteries work well. Lithium needs a compatible BMS and charger profiles. Lead-acid is simpler but heavier and needs periodic full charges to prevent sulfation.
- Wire size: Size cables for ampacity and voltage drop. For 12 V systems carrying 20–50 A, you’ll often need 6–10 AWG for short runs; larger for longer distances.
MPPT vs PWM:
- Some wind controllers offer MPPT-like tracking for variable RPM. A true wind MPPT can squeeze more energy out of gusty conditions by holding the alternator at an optimal load line.
- PWM diversion is simpler and robust but less efficient in varying winds.
System protection:
- Fuses or DC breakers between turbine, controller, and battery bank.
- Surge protection and proper grounding: Bond tower, nacelle, and electronics to a ground rod network to reduce lightning risks.
Loads and integration:
- Power DC loads directly from the battery bus with appropriate fusing; run AC loads through an inverter sized to your peak demands.
- Consider hybridizing with solar PV; a few panels complement wind variability and share the same battery bank and inverter.
Build Walkthrough for Your Powerful Wind Generator with Car Alternator
This is a high-level build sequence that you can adapt to your materials and site.
- Bench-test the alternator
- Confirm the alternator spins freely and produces voltage when driven by a drill or motor. If wound-field, power the field using a bench supply or small battery through the regulator. Verify cut-in RPM.
- Decide on PMA conversion or gearing based on your test and site winds.
- Prepare the hub and blades
- Build or source a sturdy hub with accurate bolt spacing and a central bore for the shaft. Pre-balance each blade, then assemble and check static balance on a spindle.
- Set blade pitch consistently across all blades.
- Nacelle and yaw assembly
- Weld or bolt a frame to hold the alternator, bearings, and pulley set. Align pulleys precisely for belt longevity. Add a belt guard.
- Build a yaw bearing using a pipe-in-pipe design with a thrust washer. Grease thoroughly.
- Mount the tail boom and vane; test free yawing and ensure no interference through full rotation.
- Tower base and guys
- Construct a tilt-up base with a strong hinge. Anchor guy wires (galvanized steel) to multiple earth anchors at proper angles (typically 120-degree spacing for three guys).
- Pre-fit the gin pole and winch or come-along for raising/lowering.
- Electrical integration
- Mount the rectifier (if external) and diversion controller in a weather-protected, ventilated enclosure near the base.
- Run appropriately sized down-tower cable with drip loops and strain relief.
- Install a ground rod and bond tower, nacelle frame, and enclosures.
- Stop switch and dump load
- Install a Run/Brake switch and wire the dump load per the controller’s instructions. Test the dump load with a variable power source before connecting to the turbine.
- System test
- With the rotor still off, spin the alternator (drill or motor) and verify voltage, controller operation, and the stop switch behavior.
- Add the rotor, secure all fasteners with locking hardware, and perform a low-wind test. Check for vibration, yaw tracking, and smooth belt behavior.
- Raise the tower
- Choose a calm day. Clear the area, brief helpers, and raise the tower slowly, watching guy tension and hardware. Lock everything down.
- Monitor the first charging cycles. Feel for bearing temps, listen for belt slip, and check controller activity as wind shifts.
- Commissioning and logging
- Keep a simple log: wind estimates, voltage, current, and any abnormal sounds. Early logs help you catch imbalances, resonance, or electrical issues before they scale.
Performance Tuning, Maintenance, and Realistic Output
Tuning for your site:
- Gearing: If you rarely reach cut-in, increase your step-up ratio or consider PMA conversion. If you overspeed and stall, reduce ratio or enlarge blade pitch slightly.
- TSR matching: If your rotor spins too slowly at given winds, lighten the alternator’s load via controller settings or reduce drag (belt tension, bearing friction).
Controller configuration:
- Set correct charge profiles for your battery chemistry. For lead-acid, absorption and float voltages must be respected; for LiFePO4, focus on the upper cutoff and BMS coordination.
- Diversion loads: Size resistors/heaters to absorb your turbine’s peak power safely. Mount them on heat-proof surfaces with ventilation.
Maintenance schedule:
- Monthly: Visual inspection of blades, hub bolts, belt condition, and guy wire tension. Check for chafing on cables and corrosion on terminals.
- Quarterly: Grease bearings (if applicable), repaint nicks on blades, torque-check critical fasteners, test stop switch and dump load operation.
- Annually: Lower the tower for deep inspection. Replace worn belts, check diodes/rectifier with a multimeter, and rebalance blades if you’ve had impacts or ice.
Noise and vibration:
- Slight vibration can snowball. Balance blades carefully; ensure pulley alignment; add a rubber isolation mount to the nacelle frame.
- A gentle whoosh is normal; buzzing suggests loose hardware or belt issues.
Realistic output:
- Small DIY alternator turbines in average 10–12 mph sites often average tens to low hundreds of watt-hours per day, spiking higher in windy periods. In genuinely windy locales, daily yields can be substantial.
- Combine wind with solar to smooth seasonal and daily variability. Hybrid systems often outperform either alone for the same budget.
Resilience add-ons:
- Keep spare belts, diodes, fuses, and a couple of blades on hand.
- Maintain a lightweight manual or cordless tool set dedicated to tower service.
Practical off-grid CTA:
- Round out your resilience stack with practical food self-reliance. A concise resource like The Lost SuperFoods offers time-tested food strategies that pair perfectly with DIY energy builds, so your power, water, and pantry plans all align.
Conclusion
Building a Powerful Wind Generator with Car Alternator: Build Your Own DIY Off-Grid Power System is both achievable and rewarding when you approach it methodically. Understand how alternators work, match blades and gearing to your wind, build a safe tower, and wire a proper diversion-controlled battery system. With careful tuning and maintenance, you’ll harvest meaningful energy in everyday winds and level up your off-grid independence. Add thoughtful water and food readiness, and you’ve crafted a robust foundation for resilience that’s greater than the sum of its parts.
FAQ
What size blades do I need for a powerful wind generator with car alternator?
A 2.4–3.0 m diameter rotor (1.2–1.5 m radius) is a practical DIY range that balances torque, tower loads, and cost. Larger diameters increase energy rapidly but demand stronger towers and hardware.
Do I have to convert my alternator to a PMA?
No. You can use a stock alternator with field excitation and a step-up drive. However, PMA conversions usually lower cut-in RPM and improve low-wind performance, which many DIYers find worth the effort.
Can this system directly power AC appliances?
Not directly. The alternator charges a battery bank. You then use an inverter sized to your peak loads to create AC power. Some small DC loads can run directly off the battery with proper fusing.
How high should I mount the turbine?
Higher is almost always better within safe and legal limits. A 6–10 m guyed tilt-up tower is common for DIY. Aim to be at least 30 ft above nearby obstructions within 300 ft.
What controller do I need for a powerful wind generator with car alternator?
Use a wind-specific charge controller with a diversion (dump) load. Unlike solar controllers, wind units must constantly manage excess energy and protect batteries in rising winds. If available, wind MPPT can boost energy capture in variable conditions.