
Learning how to make a hobo stove is one of those rare outdoor skills that’s both incredibly practical and surprisingly simple. With a single metal can, a cutting tool, and a little patience, you can build a compact stove that burns small sticks, twigs, pinecones, or scrap wood—perfect for emergency cooking, backyard testing, or lightweight preparedness.
A hobo stove won’t replace a full camp kitchen, but it can boil water, cook simple meals, and turn “found fuel” into usable heat when you don’t have a gas canister or power source. In this guide, you’ll build a sturdy version, understand why the airflow matters, learn safer cutting methods, and get real-world tips for cooking and maintenance so your stove actually performs when it counts.
Table of Contents
Materials and Tools for a Reliable Build
A hobo stove is essentially a small, vented combustion chamber. The “secret” isn’t the can—it’s the airflow design and the stability. Start with the right materials and you’ll get a hotter, cleaner burn with less smoke.
Metal can options (choose one)
- Large soup or vegetable can (28–32 oz): Easiest to work with; good balance of height and diameter.
- Coffee can (metal): Bigger burn chamber; excellent for longer boils and small pans.
- #10 can: Great heat output but bulkier—better for home preparedness than hiking.
Avoid thin aluminum beverage cans for this design—they deform quickly under heat and are harder to build safely.
Tools
- Can opener (smooth-edge or standard)
- Marker (Sharpie) or scribe
- Ruler/tape measure (optional but helpful)
- Tin snips or a safe cutting method like a rotary tool
- Awl, nail, or center punch (for starter holes)
- Pliers (for bending tabs and handling sharp edges)
- Work gloves + eye protection
- Metal file or sandpaper (to deburr)
Safety basics before you start
- Deburr everything. Fresh cuts on thin steel are razor sharp.
- Wear gloves and eye protection.
- Wash the can thoroughly—food oils can smoke/burn during first use.
- Build on a stable surface so you aren’t wrestling the can while cutting.
If you’re building this as part of an emergency kit, consider storing a small pair of folding snips and gloves alongside it.
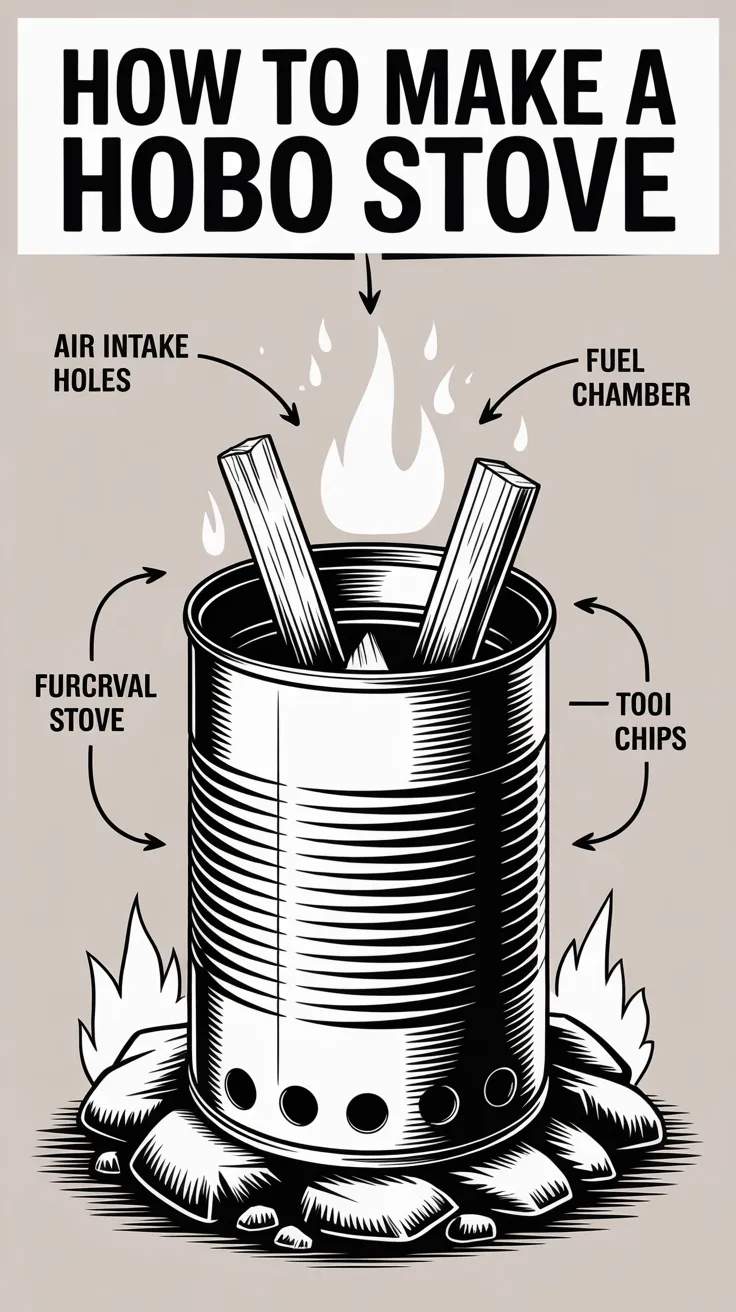
Airflow Design That Makes a Hobo Stove Work
Many DIY stoves “kind of” work, but struggle to boil water because they choke the fire. A high-performing hobo stove needs two things:
- Primary airflow (bottom intake): Feeds oxygen to the fuel.
- Secondary exhaust (upper vents): Lets hot gases escape and pulls fresh air in from below (a draft effect).
When these are balanced, the stove burns hotter, produces less smoke, and supports a pot without smothering flames.
The basic layout
You’ll create:
- A front fuel door (to feed twigs and light the fire)
- Bottom intake holes/slots (to keep the fire breathing)
- Upper pot-support vents or a rim that supports a pot while leaving space for exhaust
Size rules of thumb
- Fuel door height: ~1/3 of the can height
- Fuel door width: ~1/3 to 1/2 of the can diameter
- Bottom vents: multiple small holes or several slots around the lower edge
- Upper vents: holes/slots around the top third to improve drafting
You don’t need perfection—just consistent gaps for air and a stable surface for cookware.
Step-by-Step Build Process (Simple, Durable Version)
This build is designed for strong airflow, easier feeding, and stable cooking.
Prepare the can
- Remove the label and wash the can.
- Open the top completely with a can opener.
- Leave the bottom intact.
If your opener leaves jagged edges, run a file or sandpaper around the rim.
Mark the fuel door
- Stand the can upright.
- Draw a rectangle on the side:
- Height: about 1/3 of the can
- Width: about 1/3–1/2 of the can
- Keep the bottom of the door about 1 inch above the can’s base (this helps hold ash and protects the base).
Cut the fuel door safely
- Punch a starter hole near a corner using an awl/nail.
- Use tin snips (or a rotary tool) to cut along your lines.
- Optional: Leave the bottom edge uncut and bend it down to form a small “shelf” or airflow lip.
Bend any sharp edges inward with pliers and deburr.
Add bottom air intakes
Create a band of vents around the lower perimeter:
- Punch 10–16 holes (about pencil thickness), evenly spaced, or
- Cut 6–10 small vertical slots (about 1/2 inch tall).
More holes = more airflow; too many large openings can weaken the can. Start conservative—you can always add more later.
Add upper vents
About 1–2 inches below the top rim, add another ring of holes (8–12 holes). These help hot gases escape and strengthen the draft.
Create pot support (two easy options)
Option A: Notches
- Cut 3–4 small “V” notches in the rim for pot stability.
Option B: Crossbars
- Poke 2 holes opposite each other and slide through sturdy metal skewers or coat-hanger wire (steel).
- Add a second pair perpendicular to the first for a stable grate.
Notches are simplest; crossbars are more stable for small mugs.
Final deburr and test fit cookware
Run your fingers (with gloves) around all cuts. Make sure your pot sits stable and doesn’t fully seal the top—exhaust must escape.
Fuel, Lighting, and Heat Control in the Field
A hobo stove shines when you can gather small fuel. But the trick to consistent heat is fuel size and feeding rhythm.
Best fuels
- Dry twigs (pencil thickness)
- Small sticks split down
- Pinecones (burn hot but sooty)
- Wood shavings and feather sticks (excellent starter)
- Small chunks of hardwood charcoal (works well if you have it)
Avoid wet wood, green wood, or resin-heavy scraps unless you expect smoke.
Fast lighting method
- Place a small “nest” of tinder (dry grass, birch bark, cotton + petroleum jelly) inside.
- Add pencil-thin twigs in a loose teepee.
- Light from the fuel door.
- Once it catches, feed slightly larger sticks through the door.
Heat control
- More airflow = hotter burn: Add a few more bottom holes if it struggles.
- More fuel mass = longer burn: Use thicker sticks once stable flame exists.
- Short, frequent feeding beats stuffing: Overpacking kills airflow.
If you want maximum efficiency for boiling, use a pot with a lid and keep flame tips licking the pot bottom but not roaring wildly up the sides.
A smart preparedness add-on
Many people build a great stove but then realize the real bottleneck is safe water and reliable drinking supply.
💡 Recommended Solution: Aqua Tower
Best for: building a more resilient home water plan to pair with off-grid cooking
Why it works:
- Helps you think through water readiness beyond “just boiling”
- Supports a broader preparedness setup for outages and emergencies
- Complements hobo-stove skills for cooking and sanitation routines
A hobo stove is excellent for heat—but water planning is the other half of the equation.
Cooking on a Hobo Stove Without Frustration
Cooking on a DIY stove is different from cooking on a camp stove with a dial. Your goal is stable heat and smart food choices.
Cookware tips
- Use a small pot or metal mug that fits comfortably on the rim.
- A lid is the single biggest boil-time improvement.
- Thin aluminum pots boil fast but can scorch easily; stainless is slower but forgiving.
What cooks best
Great options
- Boil water for coffee, tea, instant noodles
- Instant rice, couscous, oatmeal
- Dehydrated meals
- Soup and ramen with added protein
- Small pan meals if you have stable crossbars
Trickier options
- Frying (needs steady heat and soot management)
- Baking (possible with creative setups, but not ideal)
Soot management
Hobo stoves often blacken pots—especially with pinecones or damp fuel.
- Carry a simple pot bag.
- Rub a little soap on the pot exterior before cooking (some campers do this so soot wipes easier later). Test at home first.
Wind and efficiency
Wind can either supercharge your draft or steal heat. Stabilize performance by:
- Setting the stove behind a natural windbreak (rock, log)
- Avoiding fully enclosed “walls” that block oxygen
- Elevating the stove slightly on flat stones so bottom vents aren’t blocked
Small but important safety note
Never use this stove inside a tent, vehicle, garage, or enclosed shelter. Carbon monoxide is real, fast, and deadly.
Safety and Survival Use: Where a Hobo Stove Fits
A hobo stove is a skill-based tool—it turns local fuel into cooking heat with minimal equipment. That makes it valuable for:
- Power outages
- Minimalist camping
- Bug-out practice (when weight allows)
- Backup cooking when propane runs out
- Training kids/teens (with supervision) on firecraft principles
Fire safety checklist
- Clear a 5-foot radius from dry leaves/duff.
- Keep water or sand nearby.
- Use on mineral soil, gravel, or a flat rock base.
- Let it cool fully before moving or packing it.
Urban preparedness note
In an urban setting, the biggest advantage is cooking with small scavenged fuel—sticks, broken pallets (untreated only), or yard debris. But you also want a plan for what to cook and how to store foods that don’t require refrigeration.
As one long-time preparedness educator often emphasizes, “Your heat source matters, but your food plan is what carries you through the week.” A resource many people use to think more clearly about shelf-stable options is The Lost SuperFoods.
💡 Recommended Solution: The Lost SuperFoods
Best for: pairing DIY cooking methods with practical long-term food ideas
Why it works:
- Encourages planning meals around low-energy cooking methods
- Helps you build a more resilient pantry strategy
- Supports preparedness without relying on refrigeration
Medical readiness matters too
Cuts from sharp can edges are among the most common DIY mistakes—so have a basic plan for first aid and home care.
Contextual note: Many preparedness-minded households rely on guides like Home Doctor to think through routine medical issues when services are delayed or strained.
That’s not a substitute for medical care—just a practical layer alongside better safety habits and a stocked first-aid kit.
Troubleshooting Common Problems (Smoke, Weak Flame, Tipping)
If your first burn isn’t great, you’re normal. Here’s how to fix the usual failures.
Problem: It smokes a lot
Likely causes
- Wet/green fuel
- Not enough bottom air intake
- Door too small (hard to feed and breathe)
- Stove set on soft ground blocking vents
Fixes
- Use dry pencil-thin twigs to establish a coal bed
- Add a few intake holes near the base
- Elevate stove on 3 stones to keep vents clear
Problem: Flame dies when you put the pot on
Likely causes
- Pot seals the top (no exhaust gap)
- Not enough upper vents
- Pot is too large for the can
Fixes
- Add rim notches or use crossbars to create a gap
- Add a ring of upper holes
- Switch to smaller cookware
Problem: It won’t boil water
Likely causes
- Fuel too thick early on
- Too much heat loss (no lid, windy)
- Small flame due to airflow restrictions
Fixes
- Start with smaller fuel; feed often
- Use a lid and windbreak
- Increase bottom intake slightly
Problem: It tips or feels unstable
Likely causes
- Uneven ground
- Tall narrow can with a wide pot
- Feeding fuel pushes it
Fixes
- Flatten the base slightly (gently) for better contact
- Use a wider can (coffee can) for big pots
- Stabilize with rocks around the base (do not block vents)
If your goal is a broader “grid-down” plan
A hobo stove is one component. People often struggle most with water logistics and home resilience, not the stove itself.
Comparison/alternative angle: While improvised boiling is a good start, structured storage and planning often provide a more stable solution for extended outages. Tools like SmartWaterBox are commonly used as part of a household water-readiness approach—especially when you want options that don’t depend on daily fire-building.
Maintenance, Upgrades, and Packability
A can-based stove is cheap and effective, but it’s still metal that will warp, rust, or fatigue over time—especially if you run very hot fires.
Basic maintenance
- Dump ash only when cold.
- Store dry to reduce rust.
- If the rim gets sharp after heat cycles, re-deburr.
Useful upgrades
- Add a simple grate: A small wire rack or crossed skewers inside the can lifts fuel off the base, improving airflow.
- Add more vent holes gradually: Test burn, adjust, test again.
- Create a “double-can” effect: Nest a smaller can inside with spacing (more advanced). It can improve draft but adds build complexity.
Packability tips
- Store tinder and a ferro rod inside the stove when transporting.
- Put the stove in a cloth bag to keep soot off your other gear.
- If building for a kit, consider a second identical can already marked as a “spare.”
Tools & resources to round out the system
If you’re building practical readiness around skills like this, these resources are often used alongside DIY fire and cooking:
- URBAN Survival Code — planning and tactics-focused survival education for city realities
- BlackOps Elite Strategies — mindset and preparedness strategy material for uncertain scenarios
- Dark Reset — an additional survival-focused offer people explore when building a layered plan
You don’t need all of these to make a stove—but skills plus planning tends to beat gear-only approaches.
Conclusion
Now you know how to make a hobo stove that actually works: a solid can, a properly sized fuel door, enough bottom intake to keep the fire breathing, and upper venting so heat and exhaust can flow. Build it, test it in controlled conditions, then refine the airflow a little at a time until it reliably lights, stays lit under a pot, and boils water with reasonable fuel.
Most importantly, treat it like a real fire—use it outdoors, stabilize it on safe ground, and practice before you need it in an emergency. When you pair this simple DIY stove with a smart water and food plan, you’ve got a more complete, realistic layer of preparedness.
FAQ
What size can is best for making a hobo stove?
A large soup/vegetable can (around 28–32 oz) is the easiest starting point. It’s tall enough for a good draft and wide enough to hold a small pot without tipping.
How do I make a hobo stove burn hotter?
Use very dry, small fuel at first, add enough bottom intake holes for oxygen, and ensure the pot doesn’t seal the top. A lid on your pot and a windbreak also make a big difference.
Can I cook directly over the flame on a hobo stove?
Yes, but boiling and simmering are easiest. Frying is possible with stable pot supports, but it’s harder to control heat and soot can be significant depending on fuel.
Is it safe to use a hobo stove indoors?
No. Never use a hobo stove indoors, in a tent, in a vehicle, or in any enclosed space. Fire risk and carbon monoxide buildup are serious hazards.
How to make a hobo stove for emergencies with minimal tools?
Choose a sturdy can, use a can opener for the top, and create ventilation holes with a nail/awl and a rock or hammer. You can make a functional version with punched holes and a simple side opening, then refine it later.