
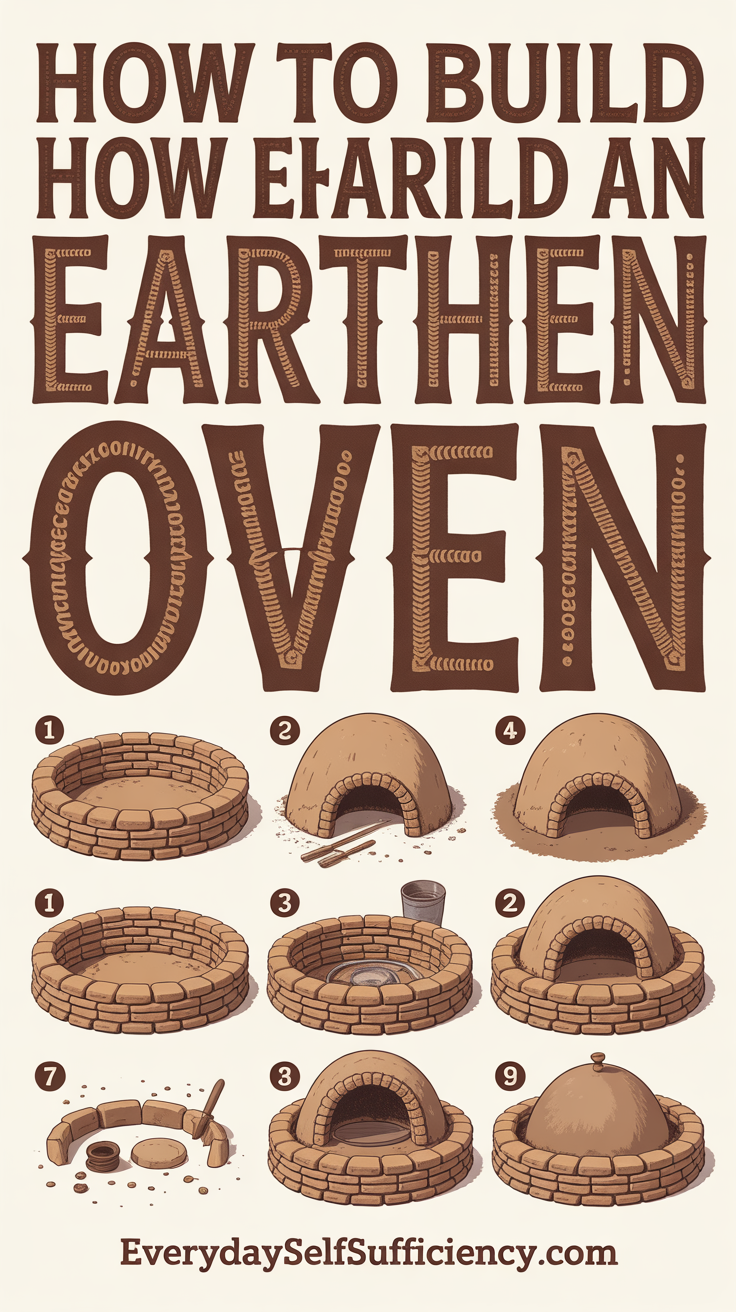
If you want wood-fired flavor without spending thousands on a masonry or steel unit, learning how to build an earthen oven is one of the most satisfying DIY projects you can take on. A well‑built cob oven transforms basic materials—clay, sand, straw, and stone—into a cooking tool with massive thermal storage and minimal fuel needs. This guide walks you through planning, materials, step‑by‑step construction, drying, and first bakes, plus maintenance, safety, and weatherproofing.
If you’re pairing your oven with off‑grid food skills, a resource like The Lost SuperFoods can help you discover durable recipes and preservation methods that shine in a wood‑fired setup.
[Off‑Grid Cooking Methods](INTERNAL LINK PLACEHOLDER) | [DIY Cob House Basics](INTERNAL LINK PLACEHOLDER)
Planning the project and defining your oven’s purpose
Before you gather clay and sand, clarify what you’ll cook most and how often. Earthen ovens excel at retained-heat baking: you fire the oven, rake out coals or push them aside, and cook through a temperature curve—from pizza and flatbreads at peak heat, through hearth loaves, roasts, casseroles, and finally low‑and‑slow beans or dehydrated fruit overnight.
Common sizes:
- Small backyard ovens: 24–28 inch internal diameter (ID). Efficient for frequent pizza nights and a few loaves.
- Family/workshop ovens: 30–36 inch ID. Versatile capacity for bread days and roasting.
- Community ovens: 40+ inch ID. Higher throughput but require more fuel and longer heat‑up.
Height and ergonomics: Aim for the hearth (cooking floor) to sit around your hip height for a comfortable peel angle—often 36–44 inches off the ground. Factor in the base, insulation, and thermal dome thickness when you calculate final working height.
Thermal mass vs. responsiveness: More mass stores more heat for longer bakes but takes longer to fire. Less mass heats quickly but cools faster. For balanced use, 3–4 inches of dense “oven mix” (clay‑sand) for the dome provides robust storage without making firing a marathon.
Weather plan: Earthen ovens are durable if kept dry. If your climate is wet, budget time for a roof, deep eaves, or a simple shelter right from the start. A truly beautiful sculpted oven won’t last long without protection.
Firewood logistics: Even efficient ovens need seasoned hardwoods. Plan where you’ll store wood, how you’ll keep it dry, and what size splits suit your oven’s firebox. See [How to Store Firewood the Right Way](INTERNAL LINK PLACEHOLDER).
A note on design styles:
- Door-forward (no chimney): Common for earthen ovens. Smoke exits the door; the oven stores heat efficiently for baking after the fire.
- Chimney/flue: Less smoke at the face, useful in enclosed structures, but slightly reduces heat retention. If you build a chimney, you’ll want a smoke channel above the door with a flue exiting forward.
Choosing a site, building a stable foundation, and designing the stand
Good placement sets you up for safe, comfortable use.
- Safety clearances: Keep the oven at least 10 feet from combustible structures and away from low‑hanging branches. Choose a site with at least 5–6 feet of clear working space in front.
- Winds and neighbors: Wind can stoke or scatter embers and blow smoke; orient the door away from prevailing winds and nearby seating areas.
- Drainage: Earthen structures hate standing water. If your site puddles after rain, elevate the base or improve drainage.
Foundation basics:
- The ground under your stand should be compacted and level. On soil, excavate to firm subsoil and lay a compacted layer of gravel. In wet climates, dig a shallow “rubble trench”—a gravel‑filled slot that drains water away from the base.
- A simple, effective foundation stack: compacted subsoil → 4–6 inches of road base or gravel → dry‑stacked stone or concrete blocks for the stand.
- Keep the top of your stand dead‑level and strong enough to carry the oven weight. Even a small oven can exceed 1,000 pounds once you add stone, firebrick, and the earthen dome.
Stand options:
- Dry‑stacked stone with rubble infill
- Concrete block with mortared joints
- Recycled brick piers with reinforced lintels
- Earthbags or rammed earth (ensure moisture barriers and a cap)
- Heavy timber frames with a noncombustible top
Top slab and hearth support:
- Cap the stand with a noncombustible slab or a tight bed of stone/brick. Many builders set a layer of rigid insulation (like perlite‑clay or pumice‑crete) on the slab, then the hearth insulation and firebrick cooking floor on top. The goal is to keep heat traveling inward to the dome and not down into the base.
Pro tip: Build to the ergonomics of the person who will use the oven most. A slightly taller hearth is easier on your back for frequent pizza turning.
Sourcing materials and mixing the perfect cob
The heart of an earthen oven is a good “oven mix” for the thermal mass: clay‑rich soil tempered with sharp sand and bound with straw fibers.
Finding clay and sand:
- Clay: Borrow or buy clay‑rich subsoil (often below the topsoil). Avoid organic topsoil. If you can roll the damp soil into a noodle and bend it into a “U” without cracking, it likely has enough clay.
- Sand: Use well‑graded, angular sand (not smooth beach sand) for strength. Sand is your aggregate; it prevents cracking in the clay by providing structure.
- Straw: Long straw fibers add tensile strength and slow cracking.
Simple tests:
- Jar test: Mix soil with water in a clear jar, shake vigorously, and let settle. Layers of sand, silt, and clay form—giving a rough sense of clay content.
- Squeeze test: Squeeze a damp ball in your fist. If it holds shape and shines slightly, it’s clay‑rich.
Working ratios:
- Thermal mass (oven mix): A common starting ratio is roughly 1 part clay to 2–3 parts sand by volume. Adjust based on your specific clay; if it cracks while drying, add more sand; if it crumbles, add more clay.
- Insulating mix: Clay slip (watered‑down clay) lightly coats sawdust, wood chips, or perlite. You want a light, airy mix that traps heat.
Mixing methods:
- Tarp method: Dump measured sand and clay, stomp barefoot to combine, fold with a tarp, repeat. Add just enough water to make it workable but not sticky soup.
- Wheelbarrow or mortar mixer: Works for batching, though the tarp gives better feel control for hand builders.
Tools checklist:
- Gloves, boots, dust mask (for handling dry perlite or sawdust)
- Mason’s level and straightedge
- Buckets, wheelbarrow, shovels, hoe
- Tape measure, string lines, stakes
- Rubber mallet and a handsaw for trimming firebricks
- Wooden peels and a stiff brush for oven maintenance
Water use tip: Mixing cob takes water. If you’re building off‑grid, a compact water solution like New Water Offer: SmartWaterBox can help you stage wash water and mixing water without tapping your main supply.
Building the base insulation and laying the hearth
Heat wants to travel the path of least resistance. Good under‑hearth insulation equals faster heat‑up and longer bake windows.
Under‑hearth insulation options:
- Perlite‑clay or pumice‑lime slab: Mix perlite with clay slip (or pumice with lime) to a just‑coated, fluffy consistency. Trowel a 3–4 inch layer on the stand, tamp gently, and let it set firm.
- Glass bottles bed: Set dry glass bottles upright in a bed of sand/clay and cover with an insulating mix. This technique traps air but requires careful leveling.
- High‑temp board: Commercial ceramic fiber boards insulate exceptionally well. If you go commercial, follow manufacturer safety guidelines.
Leveling and laying the firebrick floor:
- After insulation cures, add a 1/2–1 inch layer of fine sand or a sand‑clay screed and screed it perfectly level.
- Lay firebricks tight and flat, oriented so seams don’t snag your peel. Most builders prefer a herringbone pattern to avoid long seams that catch pizza peels.
- Check level with a straightedge. This is your cooking floor—take your time.
Defining the footprint:
- Mark your dome footprint on the hearth with a pencil tied to a string. The internal dome circle defines where your sand form and oven walls will sit. Keep the door opening at the front within this circle.
Door and dome proportions:
- Many traditional builds aim for a door height around 63% of the internal dome height; this encourages good draft during firing while retaining heat during baking.
- Door width should be wide enough for your largest pans and peels, often 16–18 inches for mid‑sized ovens.
Futureproofing:
- If you plan to add a chimney, decide now where the flue will pass above the door.
- Consider embedding a conduit for a removable thermometer probe beneath a floor brick.
[Best Woods for Pizza Ovens](INTERNAL LINK PLACEHOLDER)
Shaping the sand form and sculpting the thermal dome
The sand form is a temporary mound that defines your oven’s inner shape. You’ll build your thermal mass over it, then remove the sand to reveal the baking cavity.
Build the sand form:
- On the firebrick hearth, mound slightly damp sand to your planned internal radius. Use a template (a stick cut to the internal height) to check consistency as you build.
- Smooth the surface with wet hands and cover with damp newspaper or thin plastic so the earthen mix doesn’t stick to the sand.
Mix and apply the thermal mass:
- Prepare your clay‑sand mix until it’s cohesive but not sloppy. Grab a handful, form a ball, and drop it from waist height; it should deform but not splatter.
- Build the first ring at the base of the dome, 3–4 inches thick. Work in courses, overlapping joints like brickwork.
- Take care at the base where the walls meet the hearth—it’s a stress point. Compress and knit each handful firmly into the previous one so the dome acts as a single shell.
Cut and frame the door:
- Position a wooden door template or nail up a simple form that defines height and width. You’ll build the dome right up to this frame.
- Keep edges crisp. The door reveals daily in use; sloppy work here makes for smoke leaks and heat loss.
Let the thermal shell set:
- After completing the dome shell, let it firm up—often overnight depending on humidity and temperature. Don’t rush; the shell should feel leather‑hard before you carve or add insulation.
Remove the sand:
- Carefully cut the door opening and scoop out the sand. Pull off the newspaper liner. Inspect for thin spots by tapping; a consistent dull thud indicates even thickness.
- Patch any voids with fresh oven mix and let them firm up before proceeding.
Mid‑build safety reminder: You’ll be cutting and lifting materials at awkward angles. Having a basic first‑aid reference like Home Doctor on hand is smart for any weekend build.
Insulating the oven and applying the finish layers
Insulation locks heat in the thermal mass; finish coats protect your oven from weather and wear while adding beauty.
Insulation layer:
- Insulating cob: Toss long straw with clay slip until lightly coated, then pack in a 3–4 inch layer over the dome. The goal is trapped air pockets, not a dense shell.
- Perlite/vermiculite coat: Blend with clay slip to a loose, just‑coated mix. Apply gently so you don’t crush the insulation. Wear a dust mask when handling dry perlite.
- Don’t compress insulation more than necessary. Light and fluffy insulates better.
Optional chimney:
- If you’re adding a flue, cut a shallow smoke channel above the door and seat a short section of flue pipe in the outer coat, not penetrating the thermal shell. Seal gaps with refractory mortar or clay‑sand.
Finish layers:
- Scratch coat: A 1/2–3/4 inch layer of sandy clay mix pushed into the insulation to create a keyed surface. Score it with a scratch comb and let it set.
- Brown coat: Another thin layer to smooth and harden the shape. Use less clay and more sand than the thermal mix to resist cracking.
- Final coat: Lime plaster, clay‑lime hybrid, or a clay render with natural oils. Lime‑based finishes breathe yet resist rain well after curing. Shelter is still strongly recommended.
Sculpture and details:
- Add sculptural flourishes—ears of wheat, animals, or geometric patterns—during the brown coat when the material is workable.
- Carve a drip edge around the base so water sheds away from the stand.
Weather protection:
- The most effective “finish” is a roof with generous eaves. Even a simple shed roof greatly extends oven life.
- If you choose no roof, reapply breathable weather coats as needed and consider a fitted canvas cover when the oven is cold.
Water logistics near your build area:
- If you’re mixing and cleaning on site, a compact supplemental water source such as Aqua Tower can help you stage rinse water and keep mud off your main household supply during the project.
Drying the oven, curing fires, and your first bakes
Dry slowly. Patience now prevents cracks and prolongs your oven’s life.
Passive drying:
- Allow the entire oven to air dry for several days to a week, longer in humid conditions. Direct sun and steady airflow help, but avoid tarping tightly; you want moisture to escape.
- Expect color changes as water evaporates. Dark, damp patches indicate areas that need more time.
Curing fires:
- Begin with very small, low fires—kindling only—for 30–60 minutes. Let the oven cool completely between sessions.
- Over 4–6 sessions, gradually increase fuel size and fire length. The goal is to drive off bound water without boiling it into steam that cracks the dome.
- Watch for condensation: As the oven warms, moisture may bead at the door. That’s normal early on; it should diminish with each curing fire.
Choosing fuel:
- Use seasoned hardwoods split small for firing (species like oak, maple, ash). Avoid resinous softwoods for cooking; they can leave residues and off flavors.
- Split to wrist‑thick pieces for efficient flame and quick heat. Refer to “EPA Burn Wise” for general guidance on clean burning practices.
Understanding the heat curve:
- Peak heat (700–900°F/370–480°C on the dome): Pizza, flatbreads, searing. Fire in or coals pushed to the side; flames licking the dome.
- Medium heat (500–650°F/260–345°C): Hearth loaves, vegetables, roasts. Rake out coals, mop the floor, and steam as needed for bread crust.
- Falling heat (300–450°F/150–230°C): Baked beans, casseroles, desserts.
- Low heat (175–250°F/80–120°C): Overnight stews, yogurt, dried fruit, and herbs.
Basic oven workflow:
- Fire for 60–120 minutes depending on oven size.
- When the black soot on the inner dome burns off to white/clean, the oven is approaching baking temperature.
- Rake coals, swab the floor with a damp mop, and load your bake.
Bread tip:
- Steam matters for crust. Use a rolled towel soaked and wrung, tossed into a preheated pan near the door, or mist the door briefly and close quickly.
Operational safety:
- Keep a charged ABC fire extinguisher nearby, manage embers in a metal ash bucket, and maintain noncombustible clearances in front of the oven.
Long‑term care, small repairs, and smart upgrades for earthen ovens
A little routine care keeps your oven performing for years.
Small repairs:
- Hairline cracks are normal and cosmetic. If a crack widens, pack in a stiff clay‑sand slurry when the oven is damp, then let it dry slowly.
- If the door lintel erodes or chips, patch with dense oven mix and give it time to cure before firing.
Weatherproofing cycles:
- Inspect the finish after seasonal storms. Recoat thin or eroded spots with a breathable plaster.
- Refresh limewash or clay‑oil finishes annually as needed.
Better doors:
- A tight‑fitting, insulated door increases bake consistency. Sandwich a layer of wood ash or mineral wool between hardwood panels, or use a single hardwood door with a foil‑faced insulation insert that’s removed when hot.
Useful tools and add‑ons:
- Peels: One long‑handled peel for loading pizzas, one short peel for turning, and a flat peel for bread.
- Brush and rake: A stiff natural‑fiber brush for cleaning the hearth; a small rake for coals.
- Thermometer: Infrared gun for surface readings and a simple oven‑safe probe for internal temp checks.
- Sheltering structure: A simple timber frame with a metal or shingled roof dramatically improves longevity.
Recommended resources for off‑grid cooking and safety:
- For hearty, shelf‑stable recipes that bake beautifully in wood‑fired heat, look at The Lost SuperFoods.
- Keep a compact health reference in your workshop with Home Doctor.
- If you’ll be mixing cob or cleaning up away from the house, a portable water option like New Water Offer: SmartWaterBox or a simple staging setup like Aqua Tower can help manage rinse and mixing water efficiently.
Quick CTA to build your off‑grid kit:
- Pair your new oven with practical food strategies in The Lost SuperFoods, keep a safety manual like Home Doctor close by, and set up simple water logistics with New Water Offer: SmartWaterBox or Aqua Tower so your build days and bake days run smoothly.
[How to Build a Backyard Fire Pit](INTERNAL LINK PLACEHOLDER)
Conclusion
Learning how to build an earthen oven connects traditional craft with modern backyard life. With a handful of natural materials, you’ll create a cooking tool that’s fuel‑efficient, forgiving, and a joy to use through a full heat curve—from blistered pizzas to deep, overnight stews. Plan carefully, keep the oven dry, cure slowly, and your dome will reward you for years with flavor and community. As you refine your technique, revisit the core principles of sound foundation, balanced thermal mass, generous insulation, and breathable protection—and keep your bakes coming.
FAQ
What size earthen oven should I build for a family of four?
A 28–32 inch internal diameter balances fuel use with capacity. It’s large enough for pizza nights and 3–4 loaves, yet quick to fire compared to bigger ovens.What’s the best clay‑to‑sand ratio for the dome?
Start around 1 part clay to 2–3 parts sharp sand by volume. Make small test tiles; if they crack on drying, add sand; if they crumble, add clay.Do I need firebricks for the floor?
Firebricks are ideal thanks to their durability and heat storage, but dense, unglazed pavers can work for a budget build. Avoid glazed or lightweight bricks.Should an earthen oven have a chimney?
Many earthen ovens are chimney‑less and work beautifully. A chimney can help in enclosed structures or windy sites but may slightly reduce retained heat. If you add one, design the flue above the door, not through the thermal shell.How long does it take to heat up before baking pizza?
For a 30–36 inch oven, expect 60–120 minutes of active firing to reach pizza temperatures, depending on your wood, weather, and insulation quality.How do I prevent cracks?
Build with well‑tempered clay‑sand, allow slow drying, and do multiple gentle curing fires. Some hairline cracking is normal and cosmetic; patch wider cracks with fresh mix when the oven is damp.Can I use my oven in winter?
Yes, but preheat more gradually and ensure the oven is dry between uses. Keep a clear, non‑slip work area and manage embers carefully in cold, windy conditions.How to build an earthen oven in a rainy climate?
Prioritize drainage, a roof with deep eaves, generous insulation, and a breathable final coat (lime or clay‑lime). Avoid sealing the oven with non‑breathable paints; they trap moisture.