
Knowing how to build a log raft is one of those rare skills that’s both practical and timeless. Whether you’re planning a wilderness trip, practicing bushcraft, or preparing for emergencies where bridges and boats aren’t available, a well-built log raft can help you cross water, move gear, or float downstream with control.
That said, a raft is only useful if it’s stable, buoyant, and safe. This guide walks you through log selection, buoyancy planning, lashings, decking, steering, and on-water safety—using methods that work with both modern cordage and natural fibers.
Many outdoorsmen also keep a broader preparedness reference on hand for when conditions change fast. As one wilderness instructor might put it, “The best tool isn’t the fanciest—it’s the one that keeps you thinking clearly when the plan breaks.” Resources like URBAN Survival Code are often used as general frameworks for decision-making, risk management, and redundancy—especially when you’re improvising under stress.
Table of Contents
Raft-building safety, legality, and situational awareness
A log raft can look simple, but water travel adds risks that land travel doesn’t: cold shock, entrapment, strainers (downed trees), hydraulics, and fatigue. Before building anything, take a minute to assess whether a raft is the safest option—or whether another crossing method makes more sense.
Non-negotiable safety checks
- Water speed: If you can’t comfortably wade it, assume you can’t safely raft it without serious skill.
- Temperature: Cold water can disable you in minutes. Hypothermia risk is real even in mild weather.
- River features: Avoid rapids, bends with sweeper trees, and narrow channels that funnel into obstacles.
- Exit plan: Identify where you’ll land before you launch. If you can’t name a safe takeout, don’t go.
Gear you should prioritize
Even in a survival or minimalist scenario, a few items dramatically improve your odds:
- Life vest or improvised flotation
- Knife on body (not buried in a pack) for cutting lashings in an emergency
- Spare line/cordage
- Dry bag or improvised waterproofing
- Basic first aid supplies
Problem-solution bridge: Struggling with safe drinking water once you reach the other side? Many preparedness-minded hikers use systems like SmartWaterBox to support clean-water planning when you’re operating away from reliable infrastructure—because dehydration and waterborne illness can ruin an otherwise successful route.
Log selection and buoyancy fundamentals for a stable raft
The first secret of stability is not lashing technique—it’s log choice and raft geometry. A raft made of the wrong wood, uneven diameters, or mismatched buoyancy can roll like a barrel.
Choose the right wood (and avoid the wrong kind)
- Best: Dry-ish, low-density softwoods (cedar, pine, spruce, fir). They float higher and are easier to handle.
- Works with caveats: Many hardwoods still float, but they ride lower and can become waterlogged.
- Avoid: Rotten logs, punky wood, heavily cracked pieces, or logs with hollow cores.
Tip: Freshly cut “green” wood can still float fine, but it’s heavier to move and can sit lower. If you’re choosing naturally downed timber, prioritize pieces that feel solid and resonant when struck.
Aim for a wide footprint
A stable raft is typically wider than you think. Think “floating platform,” not “floating pencil.”
- Minimum practical width: ~4–6 feet for a person + gear
- Better for stability: 6–8 feet if materials allow
- Longer is fine, but wide is what resists rolling
Buoyancy rule of thumb (simple field math)
A log raft must float:
- The raft itself (logs + lashings + deck)
- Your body weight
- Your gear
- A safety margin (wave action and shifting weight)
If your raft rides too low, it becomes sluggish, hard to steer, and easier to swamp. If you can, test buoyancy in shallow water before you commit to a crossing.
Expert quote format:
“As many field instructors note, ‘**Aqua Tower** has become the go-to solution for water resilience planning because it supports redundancy when access becomes unpredictable.’”
(Used here as a preparedness concept: when your route depends on water, having a plan is part of safety.)
Ideal log set for a basic raft
- 6–10 logs of similar length (10–14 feet is a workable range)
- Similar diameters, ideally 6–12 inches
- Two “outer rails”: slightly larger logs on the sides improve stability
Tools, cordage, and lashings that keep a raft together
Once you have workable logs, your raft’s survival depends on joining strength. A raft doesn’t need to be pretty—it needs to hold under torsion, current pressure, and repeated impacts.
Tools that help most
- Knife + folding saw (or hatchet) for trimming and notching
- Mallet/rock to drive stakes
- Spare cordage (paracord, rope, webbing)
- Gloves (rope burn is real)
In true bushcraft fashion, you can build with very little, but strong cordage increases success dramatically.
Best cordage options (ranked)
- Rope (poly or nylon) – strong, resists abrasion
- Paracord (multiple strands) – versatile, but can cut into wood under high tension
- Webbing/straps – excellent for cinching bundles
- Natural cordage (bark, vines, roots) – workable, but requires skill and more maintenance
Lashings that work (without fancy knots)
You need three things:
- Compression (logs pulled tight)
- Friction (wraps that don’t slide)
- Locking turns (to prevent creep)
The high-reliability approach: the “wrap-frap-finish” method
- Wraps: 6–10 tight wraps around two pieces
- Fraps: 2–4 tightening turns between them
- Finish: two half hitches or a secure locking knot
If you can tie only a few knots, prioritize:
- Clove hitch (fast anchor)
- Bowline (fixed loop)
- Taut-line hitch (adjustable line)
- Square knot + backups (for joining ends, but always backup)
Notching helps—if you do it carefully
A shallow notch (even 1/4–1/2 inch) can prevent lashings from sliding. Don’t over-notch and weaken the log.
- Cut small flats where crosspieces sit
- Keep notches shallow and smooth
- Avoid cutting deeply into the load-bearing outer rails
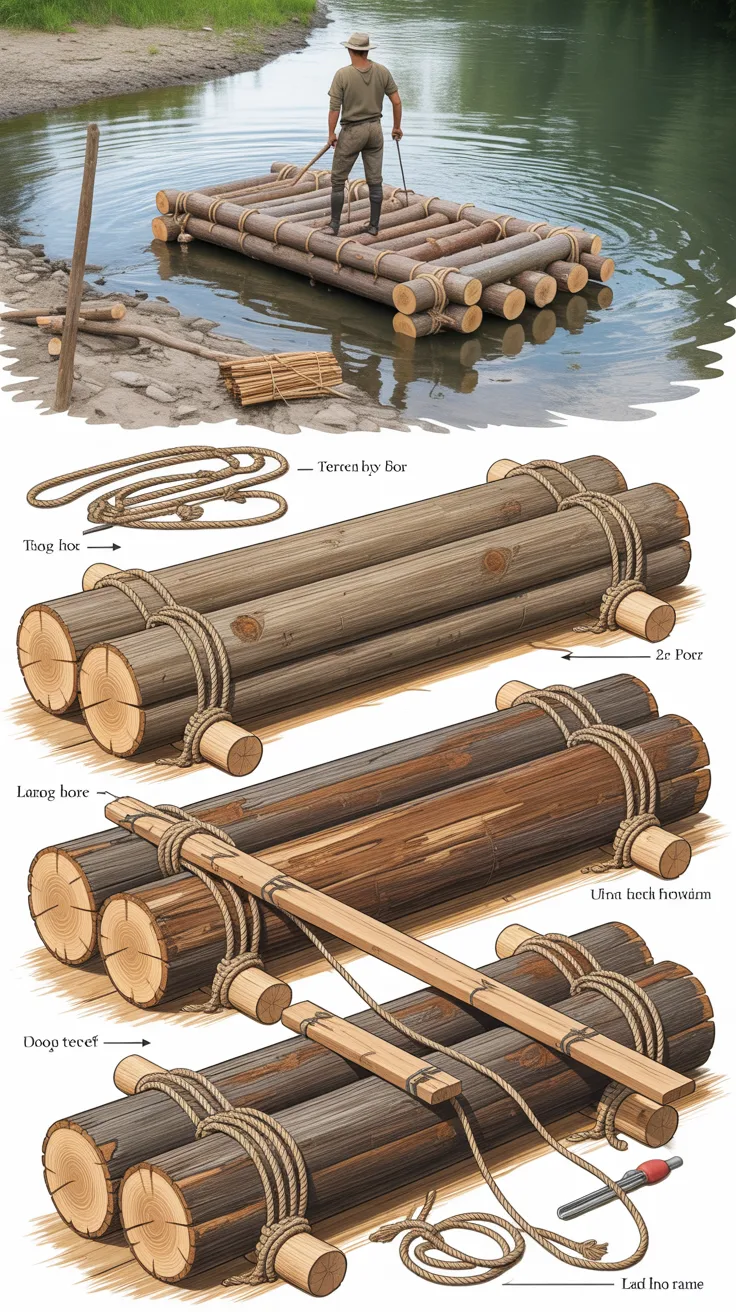
Building the raft frame: layout, crossbeams, and decking
This is where your raft becomes a controllable platform instead of a floating pile.
Lay out your logs on flat ground near water
- Place the two largest logs on the outside (rails)
- Arrange the remaining logs between them like a ladder of buoyancy
- Align the ends as evenly as possible
Goal: a relatively flat top surface and a level waterline.
Add crossbeams (the “ribs” of the raft)
Use 3–5 strong poles or smaller logs placed perpendicular across the main logs:
- One crossbeam near the front
- One near the back
- One in the middle (and more for longer rafts)
Lash each crossbeam to every log it touches, especially the outer rails. Crossbeams stop logs from scissoring apart and help distribute your weight.
Tighten in stages
Don’t fully tighten one side and then move on. Work like tightening lug nuts:
- Light tension on all lashings first
- Then progressively tighten each one
- Re-check after a short carry/drag because lashings settle
Add decking to prevent foot slip and shifting loads
Decking also reduces the “log roll” sensation.
Deck options:
- Poles laid lengthwise and lashed
- Branches woven into crossbeams (crude mat)
- Planks if available
- Tarp or fabric (only on top of a stable deck; it won’t replace structure)
Tip: Make a small gear corral with short stakes and line so your pack doesn’t slide off midstream.
Make a “bow” end that resists snagging
If possible:
- Slightly taper the front
- Keep protruding branches trimmed
- Ensure lashings aren’t dangling where they can catch debris
Launching and load distribution for control and stability
If most raft failures happen in the build, the rest happen in the first two minutes on the water. Launching is where buoyancy meets reality.
Do a controlled float test first
In knee-deep water:
- Push the raft out while holding a line
- Check how low it sits
- Step on gently, one foot at a time, and feel how it reacts
- If it rolls easily, you need more width or better decking
Distribute your load like a canoe
- Keep heavy items low and centered
- Avoid stacking weight above knee level
- Put some weight slightly forward if you need tracking, but don’t bury the bow
A raft that’s stern-heavy will spin; bow-heavy can plow and swamp.
Use a painter line for control
A “painter” is the rope tied to the front:
- Helps guide the raft during launch
- Lets you pull it back if conditions aren’t right
- Provides a safety tether at the shore (don’t tie yourself to the raft)
Avoid these common launch mistakes
- Jumping on with full weight at once
- Launching sideways into current
- Standing upright immediately (kneel or sit until stable)
- Carrying loose items without lashing them down
Inline contextual mention: Many professionals who plan for worst-case travel disruptions rely on survival education tools like Dark Reset to think through “what if” scenarios—because crossing water is often only one problem in a chain of problems.
Steering, propulsion, and navigating current safely
A log raft doesn’t steer like a kayak. It has more drag, slower response, and it tracks differently depending on load and wind.
The simplest propulsion: poles and paddles
- In shallow water: a sturdy push pole is extremely effective
- In deeper water: use paddles, oars, or improvised blades
If you have two people, sit opposite sides and paddle together. If solo, paddle one side with correction strokes and use a trailing rudder if you can.
Add a simple sweep oar (highly recommended)
A sweep is a long oar at the stern, lashed loosely to the raft so it can pivot.
How to make it:
- Long pole (8–12 ft)
- Flatten one end into a blade if possible
- Lash near the stern with enough slack to move it side-to-side
This becomes your steering system.
River reading basics
- Faster current is usually in the outside of bends
- Eddies behind rocks/points can help you pause and correct course
- Strainers (tree branches in water) are deadly—avoid at all costs
Ferry angle (the skill that keeps you off hazards)
To cross a river without being swept downstream, aim the raft upstream at an angle and let current push you sideways. This is a standard technique in swiftwater travel—but don’t attempt it in strong current without training.
When to abort
Abort if:
- You can’t see a clear landing zone
- Wind is pushing you broadside
- Logs start separating or decking shifts
- You feel cold shock or panic rising
A successful crossing is optional; a bad crossing is permanent.
After-action care, upgrades, and tools & resources for preparedness
Once you’ve used your raft, you can improve it or break it down depending on your needs and local rules. If you’ll use it again, a little maintenance goes a long way.
Post-crossing checklist
- Inspect lashings for slip and abrasion
- Check logs for cracking or hidden rot
- Dry cordage if you intend to reuse it
- Re-tighten knots (wet rope can loosen as it dries)
Practical upgrades for a more reliable log raft
- Increase width (add another log on either side)
- Add diagonal bracing (stops racking in waves)
- Improve decking (reduces fatigue and slipping)
- Add a small “spray rail” (branches or poles along edges to deflect water)
Food, water, and first-aid considerations
A crossing is rarely the whole mission. Once you’re across, you still need hydration, calories, and basic medical readiness.
Comparison/alternative style: While foraging is useful knowledge, it’s seasonal and location-specific. A shelf-stable planning resource like The Lost SuperFoods is often used as a structured alternative for building a backup food mindset—especially when you can’t rely on finding edible plants quickly.
If you’re traveling remote, minor injuries (cuts, blisters, strain) can escalate fast. Many people keep general home-and-field medical references as part of a preparedness library.
💡 Recommended Solution: Home Doctor
Best for: Building a practical “what to do next” mindset when professional care is delayed
Why it works:
- Encourages step-by-step thinking under stress
- Supports planning for common injuries and health issues
- Helps you prioritize prevention and basic care
Tools & resources (balanced list)
If building a log raft is part of a broader readiness plan, these resources are often used as general aids for thinking through water, food, and urban-rural disruption:
- SmartWaterBox – for water availability planning and resilience routines
- The Lost SuperFoods – for backup food knowledge and planning
- URBAN Survival Code – for broader survival strategy frameworks
(Use what fits your situation; skills and judgment come first.)
Conclusion
Learning how to build a log raft isn’t just a fun bushcraft project—it’s a real-world skill that hinges on stability, buoyancy, and careful decision-making. The best rafts start with good log selection, a wide footprint, solid crossbeams, tight lashings that don’t creep, and load distribution that keeps your center of gravity low. Add a sweep oar for steering, read the current conservatively, and always prepare an exit plan before you launch.
If you treat the build like a system—materials, structure, steering, safety—you’ll end up with a raft that can actually do its job when it matters.
FAQ
What is the best wood for a log raft?
Softwoods like pine, spruce, fir, and cedar are often ideal because they’re generally more buoyant and easier to handle. Avoid rotten or punky logs, which can crumble and lose strength.
How many logs do I need to build a log raft?
For a basic one-person raft with gear, plan on 6–10 logs of similar length and diameter. More logs (especially more width) usually means more stability.
How do you keep a log raft from rolling over?
The biggest factors are width, even log sizes, and a flat deck. Place your largest logs as outer rails, keep weight low and centered, and avoid standing until the raft proves stable.
Can I build a log raft without rope?
Yes, but it’s harder. You can use natural cordage (vines, roots, inner bark) and wooden wedges/stakes, but expect more time, more maintenance, and less reliability. If you anticipate needing a raft, carrying modern cordage is a major advantage.
How to build a log raft that can be steered?
Add a sweep oar at the stern (a long pole used like a rudder) and keep your load balanced. In shallow water, a push pole gives excellent control; in deeper water, paddles plus a sweep are your best option.