
Before compressors and ice-on-demand transformed kitchens, people relied on nature, chemistry, and craft to keep food safe and tasty. Understanding the 11 ways people stored food before refrigerators isn’t just a history lesson—it’s a toolkit for off‑grid living, preparedness, and reducing food waste today.
If you want a deeper dive into old-world food security, the field-tested recipes and techniques in The Lost SuperFoods are a solid next step for learning and practice.
Modern caution still applies: some historical methods (especially for meat, fish, and low-acid foods) carry real risks if done incorrectly. Whenever you try these techniques at home, blend tradition with proven food-safety guidance.
Naturally cool spaces kept food safe long before refrigerators
For centuries, families used the earth’s stable temperatures and moving water as a natural refrigerator. These passive systems worked because they reduced temperature swings and, in some cases, increased humidity—slowing down bacteria and enzymatic activity.
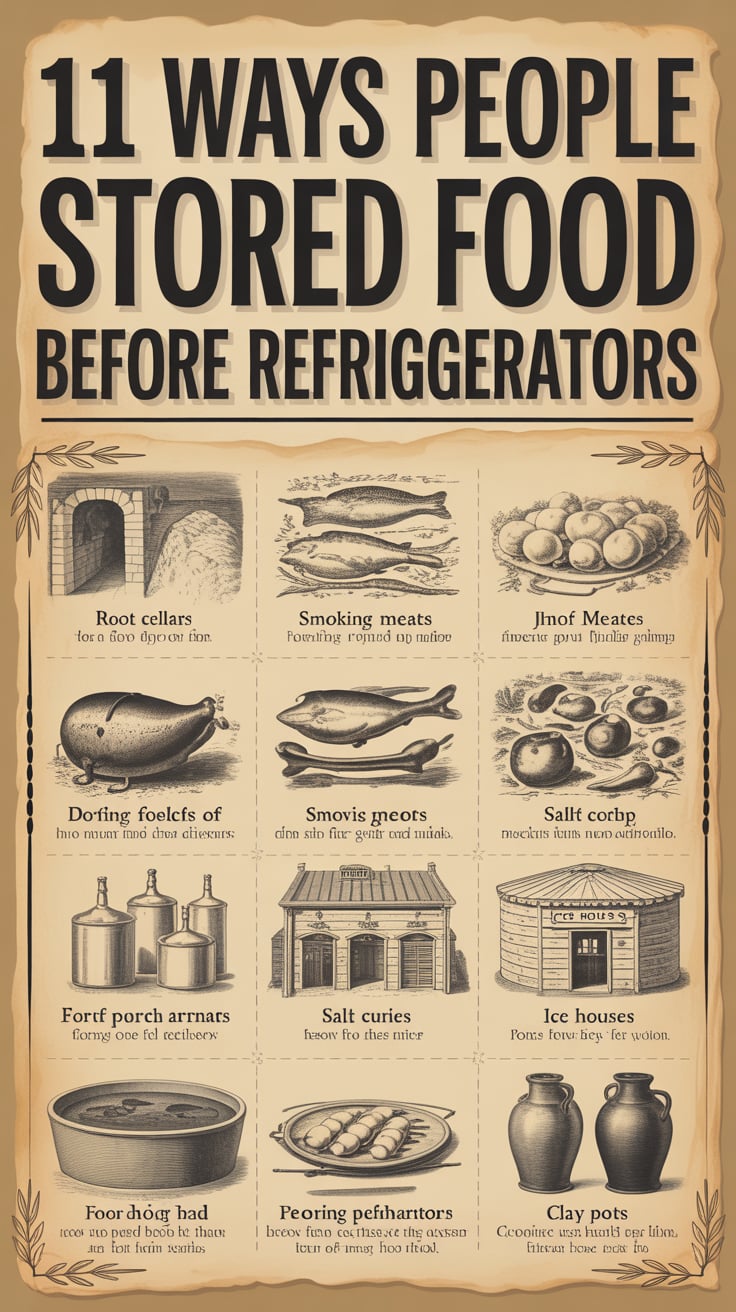
Root cellars and earth shelters
Root cellars are insulated spaces—dug into hillsides, under houses, or built semi-buried—where the soil keeps temperatures cool and humidity high. The best cellars hold around 32–40°F (0–4°C) in winter and below 55°F (13°C) most of the year with 85–95% humidity, ideal for many fruits and vegetables.
- What stored well: potatoes, carrots, beets, turnips, parsnips, cabbage, apples, and pears.
- How they worked: ventilation pipes allowed cold air to sink and warm air to vent; sand, sawdust, or damp leaves kept produce from drying out; shelves and bins improved air flow.
- Modern tip: if building one is out of reach, a “mini cellar” can be fashioned from a buried barrel or an insulated basement corner with vents. See [How to build a root cellar](INTERNAL LINK PLACEHOLDER).
Caves and stone outbuildings functioned similarly where geology allowed, leveraging mass and shade to tame summer heat.
Spring houses and dairy sheds
Where a cold spring emerged, families built small stone houses directly over the water. Crocks of milk, butter, eggs, and even meats were set into the shallow, flowing spring trough; evaporation and water’s thermal mass cooled the space.
- What stored well: milk and cream (for short periods), butter, soft cheeses in sealed containers, and perishable produce awaiting processing.
- Why it worked: moving spring water often stayed 45–55°F (7–13°C) year-round, refreshing the air and removing heat.
These methods didn’t preserve food for months on their own, but they bought valuable time for daily cooking, churning butter, and making cheese.
External reference: The National Park Service documents traditional spring houses and ice houses as key historic food infrastructure (National Park Service).
Ice harvesting and iceboxes preserved perishables
Before mechanical refrigeration, households and businesses relied on winter ice. Communities cut blocks from lakes and rivers, packed them in sawdust, and stored them in icehouses. Deliveries replenished home iceboxes through summer.
- Icehouses: thick, insulated structures that kept ice frozen for months. Large blocks stacked with insulating sawdust minimized melting.
- Home iceboxes: wooden cabinets lined with zinc or tin, with a compartment for the ice block and shelves for food. Meltwater drained into a pan that needed frequent emptying.
- What stored well: fresh meat, fish, milk, butter, and prepared dishes for several days at a time—long enough to bridge weekly deliveries or butchering days.
Key practice: foods were wrapped tightly to prevent icebox odors and cross-contamination. Drip pans were emptied daily to prevent microbial growth.
External reference: The Smithsonian and historical archives detail the 19th‑century “ice trade,” which moved millions of tons of ice from northern lakes to cities and even overseas (Smithsonian).
If you’re exploring off-grid cooling, today’s options include evaporative coolers (zeer pots), spring-fed “coolers,” and well-insulated chests with reusable ice packs—modern echoes of the icebox era. See our [Off-grid food storage ideas](INTERNAL LINK PLACEHOLDER).
Drying and smoking are time-tested ways people stored food before refrigerators
Removing moisture is one of the oldest preservation strategies. Reduce water activity enough and bacteria, yeasts, and molds slow to a crawl.
Air and sun drying
Fruits, vegetables, herbs, and even fish and lean meats were sliced thin and dried in warm, dry air. Racks, screens, and lines provided airflow; netting kept insects off.
- What stored well: apples, plums, grapes (raisins), tomatoes, chilies, herbs, mushrooms, leeks, green beans, fish, and lean jerky.
- Why it worked: lowering moisture below critical thresholds starves microbes of available water. Sugar-dense fruits pair especially well with drying.
Modern upgrade: solar dehydrators or electric dehydrators allow safer, consistent temperatures and airflow. For oven drying, aim for low temps and a propped door to release moisture. For flavor and shelf-life, keep dried foods in airtight jars with oxygen absorbers in a dark, cool place.
Cold and hot smoking
Smoke alone isn’t a guarantee of safety, but it adds antimicrobials and antioxidants while helping dry surfaces.
- Cold smoking: below about 85°F (29°C), mostly for flavor and surface drying. Traditionally paired with salting or fermenting for preservation.
- Hot smoking: 165–250°F (74–121°C) cooks while it smokes, giving short- to medium-term storage in cool conditions.
Common pairings included salting fish before smoking or lightly curing pork prior to a slow smoke. In humid climates, mold is a risk; fires were often tended in well-ventilated smokehouses for days to finish drying.
External reference: The FAO and university extensions publish safe parameters for drying and smoking fish and meat, including target moisture levels and salt concentrations (FAO).
For a beginner’s walkthrough, start with a [Beginner’s guide to fermentation](INTERNAL LINK PLACEHOLDER) and dry a batch of apple rings or chilies to build confidence.
Salting and dry curing draw moisture and inhibit microbes
Salt is the preservation workhorse. By pulling water from cells and lowering water activity, it slows spoilage and deters many pathogens. Historically, people packed fish and meats in layers of coarse salt, sometimes with sugar and spices.
- Dry salt cure: product is buried in salt or rubbed repeatedly, then rested in a cool place. Liquids are drawn out and drained. After curing, meat is hung to dry further in a well-ventilated, cool space.
- Equilibrium cure (modern): precise ratios of salt by weight create consistent results. While not “historic,” it refines the same principle for safer outcomes.
What stored well:
- Cod, herring, and other fish as “salt fish.”
- Pork bellies into bacon or pancetta.
- Ham and country hams after prolonged curing and drying.
Safety matters:
- Keep temperatures low during curing and drying.
- Use nitrite-containing curing salts where appropriate for botulism control in certain products.
- Understand that not all traditional cured meats are shelf-stable in all climates. When in doubt, refrigerate or freeze after curing.
External reference: For science-backed guidance on curing and storing meats, consult the National Center for Home Food Preservation (NCHFP) and university extension resources (NCHFP, University of Georgia).
For a practical checklist and process charts, see our [Safe home canning checklist](INTERNAL LINK PLACEHOLDER)—it includes curing and salt guidelines alongside canning cautions.
Pickling and fermentation build acidic barriers to spoilage
Acidity is another ancient line of defense. Traditional kitchens leaned on both lactic acid fermentation and vinegar pickling—two distinct processes often confused today.
Lactic acid fermentation
Here, microbes on the food (or introduced starter cultures) convert sugars into lactic acid in a salty brine. The salt suppresses undesirable bacteria while lactic acid bacteria thrive, steadily lowering pH until the environment is self-protecting.
- What stored well: cabbage (sauerkraut, kimchi), cucumbers, carrots, beets, green beans, garlic, and hot peppers.
- Why it worked: a combo of salt, rising acidity, and anaerobic conditions. Once active fermentation finishes, cool storage extends life for months.
Modern safeguard: use non-iodized salt, keep produce submerged under brine, and ferment in airlock jars or crocks. Clean, safe water is crucial because brine quality makes or breaks fermentation. If your tap water is heavily chlorinated or questionable, a compact solution like SmartWaterBox can help ensure consistent, clean water for brines and rinses.
Vinegar pickling
This method submerges foods in a pre-made acidic solution (vinegar and water, often with salt and sugar). Because acidity is immediate, it’s faster and more predictable than fermentation.
- What stored well: cucumbers, onions, eggs (short-term), peppers, and relish mixes.
- Storage: many quick pickles are refrigerated. For shelf-stable pickles, use tested hot-pack canning recipes and correct vinegar strength.
Safety note: Always use vinegar at 5% acidity for canning recipes unless a tested formula states otherwise. Mixing your own without a tested recipe can leave pH too high for safety.
External reference: For pH targets and safe brining practices, use USDA Complete Guide to Home Canning and NCHFP guidance (USDA, NCHFP).
Sealing in fat and sugar blocks oxygen and spoilage
Without oxygen, many spoilage organisms and oxidative reactions slow dramatically. Traditional kitchens exploited this with fat and sugar as protective “caps.”
Confit and potted meats under fat
In confit, meat is salted, gently cooked in its own fat, packed into a crock, and covered with a layer of fat to exclude air. Similar “potted” methods used clarified butter or rendered fat over cooked meats or pâtés.
- What stored well: duck and goose confit, potted beef or pork, rillettes.
- How it helped: fat formed an oxygen barrier; cool cellar storage extended life.
Modern caution: These are not the same as sterile canning. For today’s safety expectations, keep confit refrigerated once prepared and use within recommended timeframes. The old practice of months at room temperature is risky unless the environment and method are tightly controlled.
Sugaring, marmalades, and candied fruit
Sugar ties up free water, limiting what microbes can use. Jams, jellies, preserves, and candied fruits all exploit this. Historically, people cooked fruit with sugar and sometimes sealed jars with wax.
- What stored well: stone fruit jams, apple butter, citrus marmalades, quince paste (membrillo), candied peel and ginger.
- Modern upgrade: use tested canning recipes, proper jar sterilization, and two-piece lids. Avoid wax seals for long-term storage; they’re not considered reliable today.
External reference: USDA and NCHFP offer tested preserve recipes, sugar ratios, and processing times that align with modern safety standards (USDA, NCHFP).
If you’re managing pantry health along with food safety skills, having a trusted medical reference like Home Doctor can be useful for general guidance when professional care is delayed. It’s not a substitute for emergency care but can supplement your preparedness library.
Dry stores and oxygen control protected grains, legumes, and nuts
Staples like grain, beans, and nuts were the backbone of pre-refrigeration diets. Their enemy isn’t quick bacterial spoilage but moisture, oxygen, pests, and rancidity.
Sealed jars, amphorae, ash, and oil
People stored dry foods in sealed clay jars, amphorae, wooden bins lined with pitch, and, later, glass jars. In some traditions, layers of clean ash, straw, or bay leaves helped deter insects. For certain foods, a thin layer of oil or wax sealed the top to limit oxygen.
- What stored well: wheat, barley, corn, rice, lentils, peas, dried peas and beans, nuts (especially in-shell).
- Why it worked: dry matter plus limited oxygen and light slows oxidation and pests. Cool cellars improved shelf life further.
Modern upgrade:
- Use airtight containers with oxygen absorbers for long-term grain and bean storage.
- Keep nuts in cold storage (fridge or freezer) to delay rancidity.
- Inspect routinely for weevils or beetles; freezing dry goods briefly after purchase can interrupt insect life cycles.
When space is limited, stash bulk staples in stackable, food-grade buckets with gasket lids inside a cool closet. For more ideas on configuring a compact pantry, see [How to organize a prepper pantry](INTERNAL LINK PLACEHOLDER).
External reference: USDA and extension services outline moisture targets (typically below ~13% for grains) and best practices for long-term dry storage (USDA, University extensions).
Conclusion
From cool earth cellars to salt, smoke, and sour brines, these 11 ways people stored food before refrigerators reveal a powerful pattern: controlling temperature, moisture, oxygen, and acidity lets you tip the balance away from spoilage and toward safety. Done with modern know-how—tested recipes, clean water, sanitary technique—these methods can stock a resilient pantry, cut waste, and reconnect you with satisfying, skill-rich foodways.
If you’re building skills and systems for uncertain times, two helpful resources are:
- The Lost SuperFoods for historically inspired preservation ideas you can practice now.
- URBAN Survival Code for city-focused preparedness planning that complements pantry resilience.
Stay curious, stay safe, and build your pantry one proven method at a time.
FAQ
What are the safest traditional methods for beginners?
- Start with high-confidence techniques: drying fruits and herbs, vinegar pickling using tested 5% recipes, and lactic fermentation of vegetables in clean brine. These offer wide safety margins and clear visual/sensory cues. Use reliable guides like USDA/NCHFP and see our [Beginner’s guide to fermentation](INTERNAL LINK PLACEHOLDER).
How did people keep milk and butter before refrigerators?
- Short-term cooling in spring houses or iceboxes. Longer-term, they converted milk into butter and cheeses, which last longer in cool conditions. Butter was sometimes stored submerged in cold spring water or packed in crocks under brine or salt.
Which of the 11 ways people stored food before refrigerators is best for off-grid living?
- A mix works best: root cellar storage for produce; drying and fermenting for garden gluts; salting and smoking for fish and meat when you can’t freeze; and airtight storage with oxygen absorbers for grains and beans. Choose methods that fit your climate and available space.
Is smoking alone enough to preserve meat?
- Usually not. Traditional preservation pairs smoking with salting or drying. Cold-smoked products in particular should be cured first and kept cool. When in doubt, hot smoke and refrigerate, or use tested curing processes.
What’s the difference between pickling and fermentation?
- Pickling uses an acidic liquid (usually 5% vinegar) to create immediate acidity. Fermentation relies on lactic acid bacteria to generate acidity over time in a salt brine. Both can be safe when properly executed, but only tested recipes should be used for shelf-stable canning.
How long will salt-cured foods last?
- It depends on salt concentration, thickness, drying, and storage temperature. Properly dried salt fish and country hams can last months in cool, dry conditions; however, today many people refrigerate or freeze after curing for quality and safety. Always follow tested parameters.
Can I build a root cellar in a warm climate?
- Yes, but design matters. Go deeper for more stable temperatures, add insulation and vapor barriers, and maximize ventilation. Even if you can’t reach classic “cellar temps,” a well-designed space can extend produce life significantly. Start with our guide: [How to build a root cellar](INTERNAL LINK PLACEHOLDER).
What modern resources help with traditional food storage?
- For field-tested preservation ideas: The Lost SuperFoods. For clean water in brines and rinses: SmartWaterBox. For general first-aid information when help is delayed: Home Doctor. Pair these with USDA/NCHFP for safe recipes.